<?xml version="1.0" encoding="utf-8"?><feed xmlns="http://www.w3.org/2005/Atom" ><generator uri="https://jekyllrb.com/" version="4.1.1">Jekyll</generator><link href="https://blog.kipras.org/feed.xml" rel="self" type="application/atom+xml" /><link href="https://blog.kipras.org/" rel="alternate" type="text/html" /><updated>2026-01-10T22:27:48+00:00</updated><id>https://blog.kipras.org/feed.xml</id><title type="html">incentives is all you need | A blog by Kipras Melnikovas</title><subtitle>A blog by Kipras Melnikovas</subtitle><author><name>Kipras Melnikovas</name></author><entry><title type="html">Ginklo leidimas - paprastai ir aiškiai</title><link href="https://blog.kipras.org/ginklo-leidimas" rel="alternate" type="text/html" title="Ginklo leidimas - paprastai ir aiškiai" /><published>2025-08-30T00:00:00+00:00</published><updated>2025-08-30T00:00:00+00:00</updated><id>https://blog.kipras.org/ginklo-leidimas</id><content type="html" xml:base="https://blog.kipras.org/ginklo-leidimas"><![CDATA[<p><img src="/assets/ginklo-leidimas/ginklo-leidimas.png" alt="ginklo-leidimas" /></p>

<figcaption style="text-align: center;">
Iš grafiko akivaizdu, kad daugumą procesų galima pradėti iškart, nelaukiant kitų.
</figcaption>

<!-- 
	Mermaid graph of above image,
	explaining the requirements in topologically-sorted order,
	to understand clearly how to get licensed with a gun permit in Lithuania:

	graph BT;

	narkologas;
	charakteristika;
	psichiatras;
	seimos_gydytojas;
	mobilizacijos_mokykla;
	policijos_prasymas;
	ginklo_egzaminas;
	seifo_irengimas;
	dokumentu_pateikimas;
	leidimo_gavimas;

	charakteristika \-\-> psichiatras;

	narkologas \-\-> seimos_gydytojas;
	psichiatras \-\-> seimos_gydytojas;

	seimos_gydytojas \-\-> policijos_prasymas;
	mobilizacijos_mokykla \-\-> policijos_prasymas;

	policijos_prasymas \-\-> dokumentu_pateikimas;
	ginklo_egzaminas \-\-> dokumentu_pateikimas;
	seifo_irengimas \-\-> dokumentu_pateikimas;

	dokumentu_pateikimas \-\-> leidimo_gavimas;

-->

<p style="margin-top: 1.75rem; margin-bottom: 0.75rem;">
Detaliau:
</p>

<ul>
  <li>Narkologas: internetu užsisakyti narkologo pažymą.
    <ul>
      <li><a href="https://rplc.lt/paslaugos/kitos-paslaugos/pazymos-uzsakymas">https://rplc.lt/paslaugos/kitos-paslaugos/pazymos-uzsakymas</a></li>
    </ul>
  </li>
  <li>Charakteristika:
    <ul>
      <li>Iš darbdavio, mokymo įstaigos, savivaldybės ar kitos institucijos gauti charakteristiką. Jeigu turite savo įmonę - iš buhalterio ar savivaldybės.
        <ul>
          <li>Užsisakant iš savivaldybės: <a href="https://www.epaslaugos.lt/portal/providers/42643">https://www.epaslaugos.lt/portal/providers/42643</a></li>
        </ul>
      </li>
    </ul>
  </li>
  <li>Psichiatras: šeimos gydytojo ar priskirtoje įstaigoje.
    <ul>
      <li>Norint sužinoti, kur reikia atlikti patikrą, galima paklausti šeimos gydytojo registratūros.</li>
      <li>Reikia turėti paskutinių 10 metų šeimos gydytojo įstaigos istoriją (man užteko e-sveikatos, tad niekur papildomai rinkti popierių nereikėjo).</li>
      <li>Priskirtoje įstaigoje - užsiregistruoti psichiatro konsultacijai dėl leidimo ginklui.
        <ul>
          <li>Man pirma siūlė laikus tik kitą savaitę; paklausus, ar galima butų iškart šiandien, leido, buvo neženkliai brangiau.</li>
          <li>Pati apžiūra gana paprasta.</li>
        </ul>
      </li>
    </ul>
  </li>
  <li>Šeimos gydytojo apžiūra:
    <ul>
      <li>Irgi nesunkiai praėjo. Tikrina pulsą, regą, klausą, lygsvarą ir pnš.</li>
      <li>Vėliau vyksta ginklo leidimo komisija, čia irgi šeimos gydytojo įstaigoje.
        <ul>
          <li>Jeigu viskas gerai šeimos gyd. apžiūroje, galimai net nereikės atvykti.</li>
        </ul>
      </li>
      <li>Gavus teigiamą išvadą, forma E049/a įrašoma į e-sveikatą.</li>
    </ul>
  </li>
  <li>Mobilizacijos mokykla: <a href="https://mobilizacijosmokykla.lt">https://mobilizacijosmokykla.lt</a>
    <ul>
      <li>Reikės pažiūrėti porą filmukų, paskaityt tekstą, atsakyt į kelis klausimus. 30min ir baigta.</li>
    </ul>
  </li>
  <li>Policijos prašymas: <a href="https://epolicija.lt/eservice/1/preview">https://epolicija.lt/eservice/1/preview</a>
    <ul>
      <li>Taip pat, verta pateikti prašymą dėl neterminuoto (C kat.) leidimo turėti ginklus, nes, nors ir turint B kategorijos leidimą, C kat. ginklų turėti negalima.
        <ul>
          <li>Čia vienintelis reikalavimas yra 049/a forma.</li>
          <li><a href="https://www.epolicija.lt/eservice/4/preview">https://www.epolicija.lt/eservice/4/preview</a></li>
        </ul>
      </li>
    </ul>
  </li>
  <li>Ginklo egzaminas: išlaikyti egzaminą (mokymus teikia privačios įmonės) ir gauti pažymėjimą.</li>
  <li>Seifo įrengimas: įsirengti tinkamas sąlygas ginklui laikyti ir gauti pažymėjimą.
    <ul>
      <li><a href="https://www.epolicija.lt/eservice/3/preview">https://www.epolicija.lt/eservice/3/preview</a></li>
    </ul>
  </li>
  <li>Dokumentų pateikimas: pateikti policijai dokumentus, gauti teigiamą atsakymą, sumokėti rinkliavą.</li>
</ul>

<hr />

<p><br /></p>

<p>Naudinga informacija:</p>
<ul>
  <li><a href="https://gynyba.eu/ko-reikia-norint-gauti-leidima-laikyti-nesiotis-ginklus">https://gynyba.eu/ko-reikia-norint-gauti-leidima-laikyti-nesiotis-ginklus</a></li>
  <li><a href="https://gynyba.eu/wp-content/uploads/2023/11/Testas.pdf">https://gynyba.eu/wp-content/uploads/2023/11/Testas.pdf</a></li>
  <li><a href="https://ginkluotascivilis.lt/kaip-gauti-leidima-ginklui">https://ginkluotascivilis.lt/kaip-gauti-leidima-ginklui</a></li>
  <li><a href="https://e-seimas.lrs.lt/portal/legalAct/lt/TAD/TAIS.159542/asr">https://e-seimas.lrs.lt/portal/legalAct/lt/TAD/TAIS.159542/asr</a>
    <ul>
      <li>17, 18 ir kiti straipsniai</li>
    </ul>
  </li>
</ul>]]></content><author><name>Kipras Melnikovas</name></author><summary type="html"><![CDATA[]]></summary><media:thumbnail xmlns:media="http://search.yahoo.com/mrss/" url="https://blog.kipras.org/assets/ginklo-leidimas/ginklo-leidimas.png" /><media:content medium="image" url="https://blog.kipras.org/assets/ginklo-leidimas/ginklo-leidimas.png" xmlns:media="http://search.yahoo.com/mrss/" /></entry><entry><title type="html">Develop, debug and contribute to core git on MacOS</title><link href="https://blog.kipras.org/devel-core-git-macos" rel="alternate" type="text/html" title="Develop, debug and contribute to core git on MacOS" /><published>2024-03-27T00:00:00+00:00</published><updated>2024-03-27T00:00:00+00:00</updated><id>https://blog.kipras.org/devel-core-git-macos</id><content type="html" xml:base="https://blog.kipras.org/devel-core-git-macos"><![CDATA[<p>By the end of this article, you’ll have a fast &amp; comfortable setup to develop, debug and contribute to core git on MacOS (apple silicon). You’ll explore git’s codebase with various tools, write your very first patch, and learn a thing or two about the contribution process.</p>

<p><img src="/assets/devel-core-git-macos/gdb-server-vscode.png" alt="gdb-server-vscode" />
<!-- <img alt="gdb-server-vscode" src="/generated/assets/devel-core-git-macos/gdb-server-vscode-800-c07381db1.png" srcset="/generated/assets/devel-core-git-macos/gdb-server-vscode-1336-c07381db1.png 1336w, /generated/assets/devel-core-git-macos/gdb-server-vscode-2672-c07381db1.png 2672w, /generated/assets/devel-core-git-macos/gdb-server-vscode-5344-c07381db1.png 5344w">
 --></p>

<p><br /></p>
<h2 id="contents">Contents</h2>

<ul>
  <li>Setup a lightweight linux environment (<code class="language-plaintext highlighter-rouge">gdb</code> &amp; friends don’t work on apple silicon)</li>
  <li>The development workflow with <code class="language-plaintext highlighter-rouge">VSCode</code>, <code class="language-plaintext highlighter-rouge">VSCodium</code>, <code class="language-plaintext highlighter-rouge">Neovim</code> or other</li>
  <li>The debug workflow with <code class="language-plaintext highlighter-rouge">gdb</code>, and then <code class="language-plaintext highlighter-rouge">gdb-server</code> + editor of choice</li>
  <li>Exploring code via call graphs using <code class="language-plaintext highlighter-rouge">valgrind</code>, <code class="language-plaintext highlighter-rouge">kcachegrind</code> and <code class="language-plaintext highlighter-rouge">hotspot</code></li>
  <li>Writing your very first patch</li>
  <li>Advice for submitting patches &amp; other resources</li>
  <li>Appendix</li>
</ul>

<p><br /></p>

<h2 id="lightweight-linux-environment">Lightweight linux environment</h2>

<p>Apart from being easier to setup for development, and more closely matching the environment that most people use to contribute to core git, linux also has a much more convenient debugging tool - <code class="language-plaintext highlighter-rouge">gdb</code>. We’ll be utilizing <code class="language-plaintext highlighter-rouge">gdb-server</code> to make debugging with VSCode a breeze. For all this, we’ll need a linux environment.
<!-- TODO "much more convenient" --></p>

<p>I’ve tried a few different approaches:</p>

<!--
- A simple docker container; however, the whole environment gets reset on every exit/stop of the container, making it completely unusable for our use case.
- Dev Containers / Docker Dev Environments -- looked promising but they setup a very minimal Ubuntu instance, too minimal in fact, and it was hard to expand to a proper environment. Also, the tools felt a little incomplete yet, with some details in need of polishing.
- Finally, [multipass](https://github.com/canonical/multipass). "Multipass is a CLI tool that orchestrates virtual Ubuntu instances" -- a great fit for our purposes.
-->

<ul>
  <li>A simple docker container</li>
  <li><a href="https://github.com/devcontainers/spec">Dev Containers</a> / <a href="https://github.com/docker/dev-environments">Docker Dev Environments</a></li>
  <li><a href="https://github.com/canonical/multipass">Multipass</a></li>
</ul>

<p>My original choice was Multipass – it looked like the right tool for the job. However, I kept running into various issues, which are discussed below in <a href="#appendix-x--multipass">Appendix X</a>.</p>

<p>Then I tried Dev Containers, but they didn’t provide anything better over a simple docker container; actually made it worse because there’s more dependencies to install to get started.</p>

<p>So I finally tried just a simple docker container, and I couldn’t believe how easy it was to work with.</p>

<p>Let’s set it up:</p>

<ul>
  <li>1st, let’s clone git’s git repo (it’s a good idea to fork it on GitHub: <a href="https://github.com/git/git/fork">https://github.com/git/git/fork</a>)</li>
</ul>

<!--
TODO SWITCHER: https/ssh
TODO SWITCHER: INPUTS - github username (if forked)
-->

<div class="language-sh highlighter-rouge"><div class="highlight"><pre class="highlight"><code>git clone https://github.com/git/git
</code></pre></div></div>
<div class="language-sh highlighter-rouge"><div class="highlight"><pre class="highlight"><code>git clone git@github.com:git/git
</code></pre></div></div>

<ul>
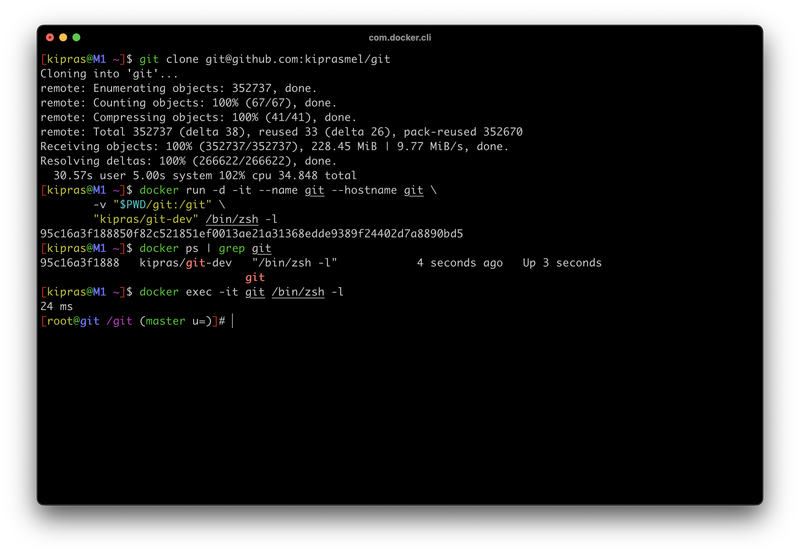
  <li>then, let’s run <a href="https://hub.docker.com/r/kipras/git-dev">a docker container</a> that I’ve prepared for developing core git. It includes a base ubuntu image, dependencies for developing &amp; debugging git, and some extras for convenient use. The first  <code class="language-plaintext highlighter-rouge">-v</code> flag mounts the cloned git repo at <code class="language-plaintext highlighter-rouge">/git</code>, meanwhile <code class="language-plaintext highlighter-rouge">-p</code> opens a local port <code class="language-plaintext highlighter-rouge">2020</code> for ssh access. The other flags are for X11, which we’ll come back to later.</li>
</ul>

<div class="language-sh highlighter-rouge"><div class="highlight"><pre class="highlight"><code>docker run <span class="nt">-d</span> <span class="nt">-it</span> <span class="nt">--name</span> git <span class="nt">--hostname</span> git <span class="se">\</span>
	<span class="nt">-v</span> <span class="s2">"</span><span class="nv">$PWD</span><span class="s2">/git:/git"</span> <span class="se">\</span>
	<span class="nt">-p</span> 2020:22 <span class="se">\</span>
	<span class="nt">-e</span> <span class="s2">"DISPLAY=host.docker.internal:0"</span> <span class="se">\</span>
	<span class="nt">-v</span> <span class="s2">"/tmp/.X11-unix:/tmp/.X11-unix"</span> <span class="se">\</span>
	<span class="nt">-v</span> <span class="s2">"</span><span class="nv">$HOME</span><span class="s2">/.Xauthority:/root/.Xauthority"</span> <span class="se">\</span>
	<span class="s2">"kipras/git-dev"</span>
</code></pre></div></div>
<blockquote>
  <p>If you want to configure your own image, see the <a href="https://github.com/kiprasmel/infra/blob/master/local/devel-core-git/Dockerfile">Dockerfile</a> I used.</p>
</blockquote>

<ul>
  <li>and let’s open a shell into it</li>
</ul>

<div class="language-sh highlighter-rouge"><div class="highlight"><pre class="highlight"><code>docker <span class="nb">exec</span> <span class="nt">-it</span> git zsh <span class="nt">-l</span>
</code></pre></div></div>

<p>and here it is:</p>

<p><img src="/assets/devel-core-git-macos/git-docker-container.png" alt="git-docker-container" />
<!-- <img alt="git-docker-container" src="/generated/assets/devel-core-git-macos/git-docker-container-800-cd0411d61.png" srcset="/generated/assets/devel-core-git-macos/git-docker-container-960-cd0411d61.png 960w, /generated/assets/devel-core-git-macos/git-docker-container-1920-cd0411d61.png 1920w, /generated/assets/devel-core-git-macos/git-docker-container-2420-cd0411d61.png 2420w">
 --></p>

<ul>
  <li>Let’s also configure ssh</li>
</ul>

<div class="language-sh highlighter-rouge"><div class="highlight"><pre class="highlight"><code><span class="nb">cat</span> <span class="o">&gt;&gt;</span> ~/.ssh/config <span class="o">&lt;&lt;</span><span class="no">EOF</span><span class="sh">
Host git
	HostName 	localhost
	Port 		2020
	User		root
	ForwardAgent 	yes
</span><span class="no">EOF

</span><span class="nv">PUBKEY_PATH</span><span class="o">=</span><span class="s2">"</span><span class="nv">$HOME</span><span class="s2">/.ssh/id_rsa.pub"</span>
<span class="nv">PUBKEY</span><span class="o">=</span><span class="s2">"</span><span class="si">$(</span><span class="nb">cat</span> <span class="s2">"</span><span class="nv">$PUBKEY_PATH</span><span class="s2">"</span><span class="si">)</span><span class="s2">"</span>
docker <span class="nb">exec </span>git sh <span class="nt">-c</span> <span class="s2">"echo '</span><span class="nv">$PUBKEY</span><span class="s2">' &gt;&gt; ~/.ssh/authorized_keys"</span>
</code></pre></div></div>

<ul>
  <li>and try it out</li>
</ul>

<div class="language-sh highlighter-rouge"><div class="highlight"><pre class="highlight"><code>ssh git
</code></pre></div></div>

<p>Container setup is now complete.</p>

<blockquote>
  <p>Note: everything here can be automated, see my <a href="https://github.com/kiprasmel/infra/tree/master/local/devel-core-git">infra/local/devel-core-git</a> scripts.</p>
</blockquote>

<p><br /></p>

<h2 id="the-development-workflow">The development workflow</h2>

<p>We’ll need an editor. Here I’ve described the setup for VSCode(ium), but I’ll look into setting up Neovim soon. If you have a nice setup for developing thru ssh / in a container, <a href="mailto:kipras@kipras.org?subject=Docker container editor setup">send me an email</a>.</p>

<h3 id="installing-vscodeium">Installing VSCode(ium)</h3>

<p>If you’re fine with Microsoft’s edition of VSCode (the default), which includes telemetry, tracking &amp; proprietary licensing:</p>
<div class="language-sh highlighter-rouge"><div class="highlight"><pre class="highlight"><code>brew <span class="nb">install</span> <span class="nt">--cask</span> visual-studio-code

code <span class="nt">--install-extension</span> <span class="s2">"webfreak.debug"</span>
code <span class="nt">--install-extension</span> <span class="s2">"ms-vscode-remote.remote-ssh"</span>
code <span class="nt">--install-extension</span> <span class="s2">"ms-vscode.cpptools-extension-pack"</span>
</code></pre></div></div>

<p>Myself however, I prefer <a href="https://github.com/VSCodium/vscodium">VSCodium</a> – a “community-driven, freely-licensed binary distribution of VSCode”:</p>

<!--
TODO LATER: more notes about vscodium, that has some nuances e.g. proprietary msft extensions not available (duh), etc
-->

<div class="language-sh highlighter-rouge"><div class="highlight"><pre class="highlight"><code>brew <span class="nb">install</span> <span class="nt">--cask</span> vscodium

codium <span class="nt">--install-extension</span> <span class="s2">"webfreak.debug"</span>
codium <span class="nt">--install-extension</span> <span class="s2">"jeanp413.open-remote-ssh"</span>
codium <span class="nt">--install-extension</span> <span class="s2">"gediminaszlatkus.ctags-companion"</span>

<span class="nb">echo</span> <span class="s1">'alias code="codium"'</span> <span class="o">&gt;&gt;</span> ~/.zshrc
<span class="nb">source</span> ~/.zshrc
</code></pre></div></div>

<h4 id="usage">Usage</h4>

<div class="language-sh highlighter-rouge"><div class="highlight"><pre class="highlight"><code>code
</code></pre></div></div>

<p>There’s a little button in the very bottom left - “Open a Remote Window”. Through it, another dialog opens, allowing to select which remote to connect to. Recall our <code class="language-plaintext highlighter-rouge">git</code> ssh host - use that.</p>

<p>VSCode will now setup a <code class="language-plaintext highlighter-rouge">vscode-server</code> in the remote. Upon finishing, a new window, connected to the <code class="language-plaintext highlighter-rouge">git</code> host, will appear.</p>

<p>In the remotely-connected VSCode, open the <code class="language-plaintext highlighter-rouge">/git</code> project, and then open the integrated terminal via
<!-- <kbd>Ctrl</kbd> + <kbd>`</kbd> -->
<code class="language-plaintext highlighter-rouge">Ctrl</code> +  <code>`</code></p>

<h4 id="setting-up-intellisense-go-to-definition-find-references-etc">Setting up intellisense (go to definition, find references, etc)</h4>

<ul>
  <li>
    <p>First, make sure extensions installed locally are available in the remote (docker container). VSCode doesn’t do this automatically, so via <code class="language-plaintext highlighter-rouge">Cmd</code> + <code class="language-plaintext highlighter-rouge">Shift</code> + <code class="language-plaintext highlighter-rouge">P</code> run “Remote: Install local extensions in ‘SSH: git’”.</p>
  </li>
  <li>Then, if you installed Microsoft’s VSCode, you’re all set.</li>
  <li>For VSCodium, we’ll need to generate extra information via universal-ctags (already preinstalled in the container):</li>
</ul>

<div class="language-sh highlighter-rouge"><div class="highlight"><pre class="highlight"><code>ctags <span class="nt">-R</span> <span class="nt">--fields</span><span class="o">=</span>+nKz
</code></pre></div></div>

<p><br /></p>

<h3 id="building-git-from-source">Building git from source</h3>

<ul>
  <li>Configure &amp; build:</li>
</ul>

<div class="language-sh highlighter-rouge"><div class="highlight"><pre class="highlight"><code><span class="nb">cat</span> <span class="o">&gt;</span> config.mak <span class="o">&lt;&lt;</span><span class="no">EOF</span><span class="sh">
DEVELOPER=1
CFLAGS += -O0
CFLAGS += -g3
CFLAGS += -Wall
CFLAGS += -fno-omit-frame-pointer -fno-inline-functions
CFLAGS += -fno-inline-functions-called-once -fno-optimize-sibling-calls
</span><span class="no">EOF

</span><span class="nb">time </span>make <span class="nt">-j</span> <span class="sb">`</span><span class="nb">nproc</span><span class="sb">`</span>
</code></pre></div></div>

<ul>
  <li>run &amp; confirm works:</li>
</ul>

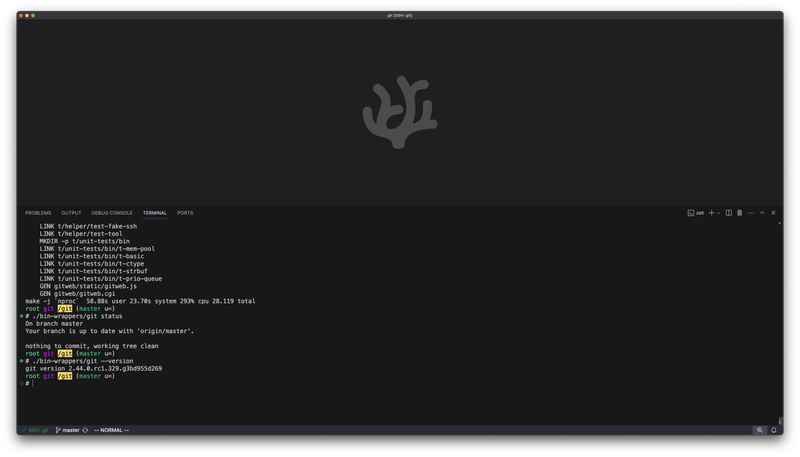
<div class="language-sh highlighter-rouge"><div class="highlight"><pre class="highlight"><code>./bin-wrappers/git status
./bin-wrappers/git <span class="nt">--version</span>
</code></pre></div></div>

<p>Looking good so far:</p>

<p><img src="/assets/devel-core-git-macos/vscodium-in-git-docker.png" alt="vscodium-in-git-docker" />
<!-- <img alt="vscodium-in-git-docker" src="/generated/assets/devel-core-git-macos/vscodium-in-git-docker-800-f14ccd0b4.png" srcset="/generated/assets/devel-core-git-macos/vscodium-in-git-docker-1336-f14ccd0b4.png 1336w, /generated/assets/devel-core-git-macos/vscodium-in-git-docker-2672-f14ccd0b4.png 2672w, /generated/assets/devel-core-git-macos/vscodium-in-git-docker-5344-f14ccd0b4.png 5344w">
 --></p>

<blockquote>
  <p>My <a href="https://gist.github.com/kiprasmel/de9160a0602463fb752f2d84d7aa4fd8">vscode config</a>, managed via <a href="https://github.com/kiprasmel/code-settings-sync">code-settings-sync</a>.</p>
</blockquote>

<!-- TODO: update ss with proper theme? -->

<p><br /></p>

<h3 id="debugging">Debugging</h3>

<p>The <code class="language-plaintext highlighter-rouge">./bin-wrappers/git</code> script is a convenient wrapper that we’ll use to run the compiled <code class="language-plaintext highlighter-rouge">git</code> binary.</p>

<h4 id="gdb">gdb</h4>

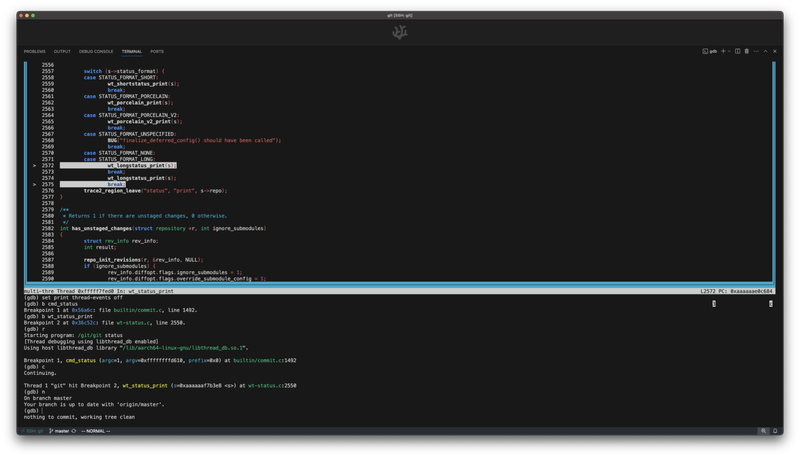
<p>Let’s first try debugging with just <code class="language-plaintext highlighter-rouge">gdb</code>. We can run whatever git command we want to explore; let’s try <code class="language-plaintext highlighter-rouge">git status</code>:</p>

<div class="language-sh highlighter-rouge"><div class="highlight"><pre class="highlight"><code><span class="nv">GIT_DEBUGGER</span><span class="o">=</span>1 ./bin-wrappers/git status
</code></pre></div></div>

<!-- TODO: support for gdb lang -->

<pre><code class="language-gdb">tui enable
set print thread-events off
b cmd_status
b wt_status_print
r
c
n
n
n
n
n
n
</code></pre>

<p><img src="/assets/devel-core-git-macos/gdb-core-git.png" alt="gdb-core-git" />
<!-- <img alt="gdb-core-git" src="/generated/assets/devel-core-git-macos/gdb-core-git-800-0fd1ca2d1.png" srcset="/generated/assets/devel-core-git-macos/gdb-core-git-1336-0fd1ca2d1.png 1336w, /generated/assets/devel-core-git-macos/gdb-core-git-2672-0fd1ca2d1.png 2672w, /generated/assets/devel-core-git-macos/gdb-core-git-5344-0fd1ca2d1.png 5344w">
 --></p>

<p>You can do a lot with just plain <code class="language-plaintext highlighter-rouge">gdb</code> – see <a href="https://gist.github.com/phil-blain/17c67740bd26e66f4851fe0c07230ea4">a writeup by Philippe Blain</a> which goes into more depth about this.
You could even set up <a href="https://github.com/hugsy/gef">gef</a> or <a href="https://github.com/cyrus-and/gdb-dashboard">gdb-dashboard</a>..</p>

<p><br /></p>
<h4 id="gdb-server--vscode">gdb-server + VSCode</h4>

<p>Myself I prefer something more visual / interactive. So let’s setup the debugging workflow for VSCode.</p>

<p>We’ve already installed the <a href="https://github.com/WebFreak001/code-debug">Native Debug</a> extension. <code class="language-plaintext highlighter-rouge">gdb-server</code> is also preinstalled in the container.</p>

<ul>
  <li>We’ll just need a <code class="language-plaintext highlighter-rouge">.vscode/launch.json</code> file:</li>
</ul>

<div class="language-sh highlighter-rouge"><div class="highlight"><pre class="highlight"><code><span class="nb">mkdir</span> <span class="nt">-p</span> .vscode
<span class="nb">cat</span> <span class="o">&gt;</span> .vscode/launch.json <span class="o">&lt;&lt;</span><span class="sh">'</span><span class="no">EOF</span><span class="sh">'
{
	"version": "0.2.0",
	"configurations": [
		{
			"type": "gdb",
			"request": "attach",
			"name": "Attach to gdb-server",
			"executable": "</span><span class="k">${</span><span class="nv">workspaceFolder</span><span class="k">}</span><span class="sh">/git",
			"target": "localhost:5177",
			"remote": true,
			"cwd": "</span><span class="k">${</span><span class="nv">workspaceRoot</span><span class="k">}</span><span class="sh">",
			"gdbpath": "/usr/bin/gdb"
		}
	]
}
</span><span class="no">EOF
</span></code></pre></div></div>

<ul>
  <li>then we’ll simply launch <code class="language-plaintext highlighter-rouge">gdb-server</code>:</li>
</ul>

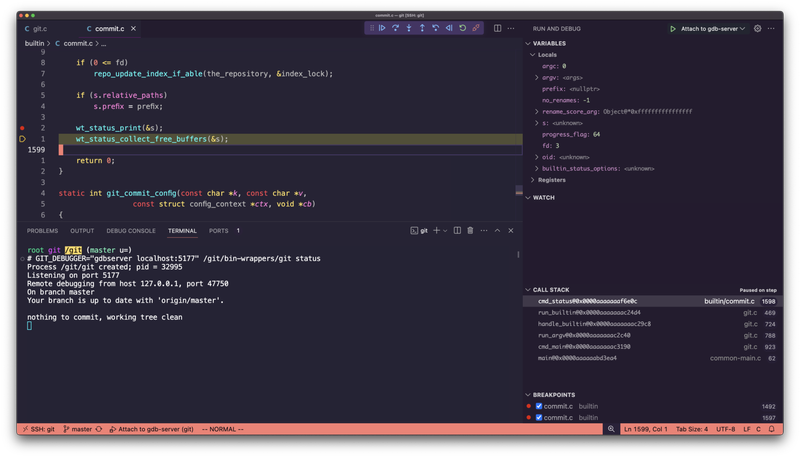
<div class="language-sh highlighter-rouge"><div class="highlight"><pre class="highlight"><code><span class="nv">GIT_DEBUGGER</span><span class="o">=</span><span class="s2">"gdbserver localhost:5177"</span> /git/bin-wrappers/git status
</code></pre></div></div>

<ul>
  <li>
    <p>then, let’s set a breakpoint – open the file selector via <code class="language-plaintext highlighter-rouge">Cmd</code> + <code class="language-plaintext highlighter-rouge">P</code>, open file <code class="language-plaintext highlighter-rouge">builtin/commit.c</code>, find (<code class="language-plaintext highlighter-rouge">Cmd</code> + <code class="language-plaintext highlighter-rouge">F</code>) the <code class="language-plaintext highlighter-rouge">cmd_status</code> function, and add a breakpoint.</p>
  </li>
  <li>
    <p>finally, connect to the gdb-server thru VSCode – open the debug panel via <code class="language-plaintext highlighter-rouge">Cmd</code> + <code class="language-plaintext highlighter-rouge">Shift</code> + <code class="language-plaintext highlighter-rouge">D</code>, select the <code class="language-plaintext highlighter-rouge">Attach to gdb-server</code> task, and start debugging!</p>
  </li>
</ul>

<p><img src="/assets/devel-core-git-macos/gdb-server-vscode.png" alt="gdb-server-vscode" />
<!-- <img alt="gdb-server-vscode" src="/generated/assets/devel-core-git-macos/gdb-server-vscode-800-c07381db1.png" srcset="/generated/assets/devel-core-git-macos/gdb-server-vscode-1336-c07381db1.png 1336w, /generated/assets/devel-core-git-macos/gdb-server-vscode-2672-c07381db1.png 2672w, /generated/assets/devel-core-git-macos/gdb-server-vscode-5344-c07381db1.png 5344w">
 --></p>

<p><br />
<br /></p>

<h2 id="writing-your-very-first-patch">Writing your very first patch</h2>

<p>Alright, let’s try changing something.</p>

<p><br /></p>

<p>Let’s do something simple. How about this: when a user runs <code class="language-plaintext highlighter-rouge">git status</code>, we print an additional “Good morning/afternoon/evening” message. It’s pretty useless, but that’s not the point here - we’d simply like to get familiar with changing git’s code.</p>

<p><br /></p>

<!--
- if rand() % 10^7 == 0 => status print wake up neo? or something like google foobar challenge?
- what if you, i don't know, wanted to break the matrix, and decided that commits should not have parents?
- verifier that good commit message, or ask red/blue pill?
- something basic, like a colorful message when status clear? like DT has on term startup?
	- or an ironic quote / roast of your changes, based off your commit content, like krazam's aspirations?
		- bonus: local LLM to generate it, to keep up w/ the kids these days (& show how ez it is to setup ollama (i assume))
			- or just vector embeddings?
			- "what are kids up to these days? self-hosted LLMs? hell yea, dudes rock"
			- could do e.g. start separate thread when git add, and then be prepared for git commit
			- FWIW, this "feature" could be implemented with just some git aliases, but.. who cares? We're here to learn.
			- -> post-add hook
				- to analyze all added files, to launch a job to analyze each & put into .git/judgements file, format: relative (to repo root) filepath, space, judgement
				- after commit, combine all, and also judge the general picture (i.e. forest instead of only just trees); put into .git/final-judgement and print into stderr when done
				- 
			- how do we implement this? where do we even start?
				- call graphs to the resque!
					- let's simulate a `git add` and see what happens behind the sheets
				- 
			- 
		
- 
-->

<p>First, to make sure the example works, let’s find some common ground and create a new branch based off of <code class="language-plaintext highlighter-rouge">v2.44.0</code>:</p>

<div class="language-sh highlighter-rouge"><div class="highlight"><pre class="highlight"><code>git checkout <span class="nt">-b</span> my-cool-feature v2.44.0
</code></pre></div></div>

<p>But, where do we even start?</p>

<p><br /></p>

<h3 id="call-graphs-to-the-resque">Call graphs to the resque</h3>

<p>It has proven useful to have a high level overview of the codebase, prior to diving deeper into details, or repeatedly smashing the “Jump to definition” shortcut in your IDE of choice.</p>

<p>There are <a href="https://en.wikipedia.org/wiki/Call_graph">many tools</a> to help us do just that - explore call/flame graphs. We’ll use <code class="language-plaintext highlighter-rouge">valgrind</code> + <code class="language-plaintext highlighter-rouge">kcachegrind</code>, and then <code class="language-plaintext highlighter-rouge">hotspot</code>.</p>

<p>We’ll need to run X11. Let’s setup <a href="https://github.com/XQuartz/XQuartz">xquartz</a>:</p>

<div class="language-sh highlighter-rouge"><div class="highlight"><pre class="highlight"><code>brew <span class="nb">install </span>xquartz

<span class="c"># allow connections from network clients:</span>
defaults write org.xquartz.X11.plist nolisten_tcp 0
</code></pre></div></div>

<p>and then reboot.</p>

<p>After each reboot, you’ll need to allow X11 access and start the docker container:</p>

<div class="language-sh highlighter-rouge"><div class="highlight"><pre class="highlight"><code>xhost +
docker start git
</code></pre></div></div>

<p>Back in the container:</p>

<div class="language-sh highlighter-rouge"><div class="highlight"><pre class="highlight"><code>apt <span class="nb">install</span> <span class="nt">-y</span> valgrind kcachegrind dbus-x11 x11-apps

<span class="c"># verify x11 + xquartz setup works:</span>
xeyes
</code></pre></div></div>

<p>some eyes should show up 👀</p>

<!--
<img src="/generated/assets/devel-core-git-macos/xeyes-387-e462f892a.png" srcset="/generated/assets/devel-core-git-macos/xeyes-387-e462f892a.png 387w">

<br/>
<br/>
-->

<p><br /></p>

<h4 id="valgrind--kcachegrind">Valgrind + kcachegrind</h4>

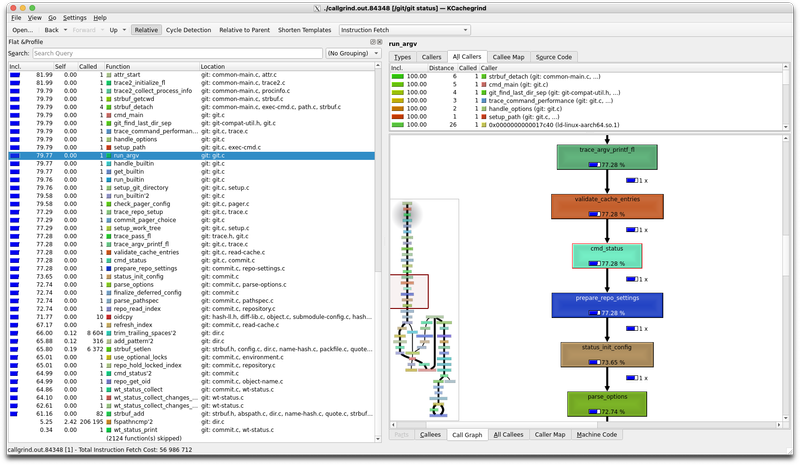
<p>Generate the callgraph for <code class="language-plaintext highlighter-rouge">git status</code>:</p>

<div class="language-sh highlighter-rouge"><div class="highlight"><pre class="highlight"><code><span class="nv">GIT_DEBUGGER</span><span class="o">=</span><span class="s2">"valgrind --tool=callgrind --instr-atstart=yes"</span> <span class="se">\</span>
	./bin-wrappers/git status
</code></pre></div></div>

<p>and then inspect it:</p>

<div class="language-sh highlighter-rouge"><div class="highlight"><pre class="highlight"><code>kcachegrind ./callgrind.out.<span class="k">*</span>
</code></pre></div></div>

<p><img src="/assets/devel-core-git-macos/callgraph.png" alt="callgraph" />
<!-- <img src="/generated/assets/devel-core-git-macos/callgraph-800-b0f8f04c2.png" srcset="/generated/assets/devel-core-git-macos/callgraph-960-b0f8f04c2.png 960w, /generated/assets/devel-core-git-macos/callgraph-1920-b0f8f04c2.png 1920w, /generated/assets/devel-core-git-macos/callgraph-3370-b0f8f04c2.png 3370w">
 --></p>

<blockquote>
  <p><a href="https://github.com/KDE/kcachegrind">kcachegrind</a>, with “Cycle Detection” off, and inside the “Call Graph” view. <a href="https://www.youtube.com/watch?v=h-0HpCblt3A">Quick overview</a>.</p>
</blockquote>

<p><br /></p>

<p>The UI is surprisingly easy to use. The idea is simple – get a high-level overview of how a certain command works, and then dig deeper into the code with a regular debugger like <code class="language-plaintext highlighter-rouge">gdb</code> as discussed above.</p>

<p>If you recall our debugging experiments, we set a few breakpoints, e.g. at <code class="language-plaintext highlighter-rouge">cmd_status</code> and <code class="language-plaintext highlighter-rouge">wt_status_print</code> – using a call graph it becomes trivial to find important parts of the code like this.</p>

<p><br /></p>

<p><img src="/assets/devel-core-git-macos/callgraph-highlight.png" alt="callgraph-highlight.png" />
<!-- <img src="/generated/assets/devel-core-git-macos/callgraph-highlight-800-28bd9957e.png" srcset="/generated/assets/devel-core-git-macos/callgraph-highlight-960-28bd9957e.png 960w, /generated/assets/devel-core-git-macos/callgraph-highlight-1920-28bd9957e.png 1920w, /generated/assets/devel-core-git-macos/callgraph-highlight-3370-28bd9957e.png 3370w">
 --></p>

<p><br /></p>

<h4 id="hotspot"><a href="https://github.com/KDAB/hotspot">hotspot</a></h4>

<p>Soon™️</p>

<p><br />
<br /></p>

<h2 id="advice-for-submitting-patches">Advice for submitting patches</h2>

<p>Soon™️</p>

<!--

You'll want to start by reading `Documentation/MyFirstContribution.txt`, and optionally `Documentation/SubmittingPatches.txt`. These go into depth about the whole process, setting up tools, making commits, formatting patches, even sending email. It was my original introduction too.

Here's how my first patch looked like:

- How I found the issue
	- context
	- debugging bash scripts with `set -x`
	- finding the bug
- The email thread:
	- https://lore.kernel.org/git/20240215083917.98218-2-kipras@kipras.org/
		- Final result: https://lore.kernel.org/git/20240217162718.21272-1-kipras@kipras.org/
		- The commit: https://github.com/git/git/commit/b21d164275b9186421ebe39498be47ea9f171694
	- takeaways:
		- multiple rerolls before even receiving first feedback -- a big sign that you're sending your patches too early
			- what I found helps - push the changes to your github fork first, and manually review yourself. revise, repeat, until looks solid. then let it rest for some hours, go for a walk or something. if no new ideas / things to fix come to mind, you're good to go
		- messing up the range-diff
			- i think the syntax from MyFirstContribution.txt was a little confusing
			- anyhow I made a tool to automate this so I don't need to worry about it, you can give it a shot: https://github.com/kiprasmel/git-reroll
				- [ ] provide usage info @ readme


---


- [ ] Finding what to work on -- you have the power of the debugger now, can explore anything
- [ ] Starting w/ simpler fixes, e.g. documentation, or shell scripts
- [ ] How my first contribution looked like
	- [ ] How encountered
	- [ ] How debugged (`set -x`)
	- [ ] How found what caused issue (parsing thru related `git log`)
	- [ ] Writing the commit message (cc `git quote` etc)
	- [ ] Look at how other ppl do things
- [ ] For submitting patches, read git's `Documentation/MyFirstContribution.txt` thoroughly
	- [ ] Includes everything from setup, to formatting patches, to sending thru email, to responding to emails and adjusting patches
	- [ ] Always think from the perspective of the maintainer:
		- [ ] Is this clear enough?
		- [ ] Is this necessary?
		- [ ] etc
		- [ ] The maintainer deals w/ all sorts of shenanigans. The least you can do is provide high signal contributions by reducing noice.
		- [ ] I find that pushing code to a remote like github, and reviewing the code there, helps prevent errors & to make the submissions clearer, so that won't have to re-submit multiple versions of the patch w/o even getting a response first, because you forgot/messed something up
- [ ] how i do it:
- [ ] link to `git-reroll`
-->

<p><br />
<br /></p>

<h2 id="appendix-x--multipass">Appendix X – Multipass</h2>

<p>Soon™️</p>

<p><br /><br /></p>

<!--
TODO: remove
or cleanup? e.g. remove the deps installing code, & tell to look at dockerfile to see what deps to install, etc
-->

<p>As briefly touched on before, <code class="language-plaintext highlighter-rouge">multipass</code> was my original go-to, until I started having issues and realized how much easier it is to work with a simple docker container.</p>

<p>The issues I encountered:</p>
<ul>
  <li>mount performance
    <ul>
      <li>Multipass uses <code class="language-plaintext highlighter-rouge">sshfs</code> for compatibility. Of course it’s slow. An alternative is available - “native mounts”. However, for me they didn’t improve the situation at all.</li>
      <li>I even tried mounting manually with <a href="https://github.com/osxfuse/osxfuse">osxfuse</a>, but no cigar.</li>
    </ul>
  </li>
  <li></li>
</ul>

<p>Nonetheless, sometimes you can only learn from your own mistakes, so here’s the original “how to get started” with multipass (note it might be outdated since not maintained).</p>

<h3 id="setup">Setup</h3>

<div class="language-sh highlighter-rouge"><div class="highlight"><pre class="highlight"><code>brew <span class="nb">install</span> <span class="nt">--cask</span> multipass
</code></pre></div></div>

<p>Creating an instance is simple. The resources can be changed later (except disk which can only be expanded). You definitely don’t need as many cpus; it’s just faster to compile, and there’ll be no effect to your system when they’re not in use anyway.</p>

<div class="language-sh highlighter-rouge"><div class="highlight"><pre class="highlight"><code>multipass launch <span class="nt">--cpus</span> 8 <span class="nt">--memory</span> 8G <span class="nt">--disk</span> 16G
</code></pre></div></div>

<p>this will create a “primary” instance, which means that many <code class="language-plaintext highlighter-rouge">multipass</code> commands won’t require you to provide a name of the instance, and will default to the primary one, for convenience.</p>

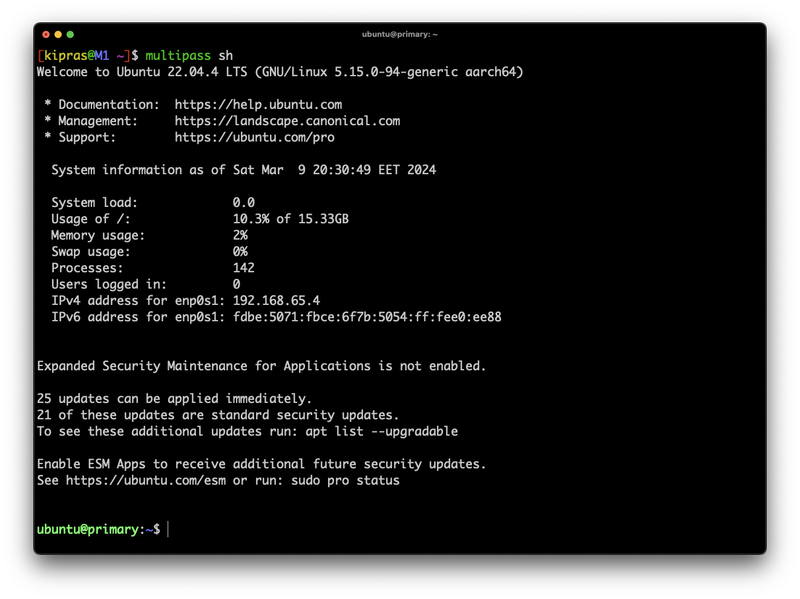
<p>Let’s connect to our newly created instance via ssh:</p>

<div class="language-sh highlighter-rouge"><div class="highlight"><pre class="highlight"><code>multipass sh
</code></pre></div></div>

<p>and here it is:</p>

<p><img src="/assets/devel-core-git-macos/multipass-vm.png" alt="multipass-vm" />
<!-- <img alt="multipass-vm" src="/generated/assets/devel-core-git-macos/multipass-vm-800-36a1992a1.png" srcset="/generated/assets/devel-core-git-macos/multipass-vm-960-36a1992a1.png 960w, /generated/assets/devel-core-git-macos/multipass-vm-1322-36a1992a1.png 1322w">
 --></p>

<p>Back on the host, let’s also setup an ssh alias <code class="language-plaintext highlighter-rouge">vm</code>, so that we can use it when connecting to the instance thru VSCode.</p>

<!--
TODO if you haven't already, [configure your ssh key to authenticate to github](TODO).
-->

<div class="language-sh highlighter-rouge"><div class="highlight"><pre class="highlight"><code><span class="nv">VM</span><span class="o">=</span><span class="s2">"primary"</span>
<span class="nv">ALIAS</span><span class="o">=</span><span class="s2">"vm"</span>
<span class="nv">PUBKEY</span><span class="o">=</span><span class="s2">"</span><span class="si">$(</span><span class="nb">cat</span> ~/.ssh/id_rsa.pub<span class="si">)</span><span class="s2">"</span>
<span class="nv">IP</span><span class="o">=</span><span class="s2">"</span><span class="si">$(</span>multipass info <span class="nt">--format</span><span class="o">=</span>csv <span class="s2">"</span><span class="nv">$VM</span><span class="s2">"</span> | <span class="nb">tail</span> <span class="nt">-n1</span> | <span class="nb">cut</span> <span class="nt">-d</span>, <span class="nt">-f3</span><span class="si">)</span><span class="s2">"</span>

<span class="c"># alias</span>
<span class="nb">cat</span> <span class="o">&gt;&gt;</span> ~/.ssh/config <span class="o">&lt;&lt;</span><span class="no">EOF</span><span class="sh">
Host </span><span class="nv">$ALIAS</span><span class="sh">
	HostName </span><span class="nv">$IP</span><span class="sh">
	User     ubuntu

	# share local ssh key with VM
	# see https://docs.github.com/en/authentication/connecting-to-github-with-ssh/using-ssh-agent-forwarding
	ForwardAgent yes
</span><span class="no">EOF

</span><span class="c"># authorize</span>
multipass <span class="nb">exec</span> <span class="nt">-n</span> <span class="s2">"</span><span class="nv">$VM</span><span class="s2">"</span> <span class="nt">--</span> <span class="se">\</span>
	bash <span class="nt">-c</span> <span class="s2">"echo '</span><span class="nv">$PUBKEY</span><span class="s2">' &gt;&gt; ~/.ssh/authorized_keys"</span>

<span class="c"># add ssh identity to ssh-agent</span>
ssh-add <span class="nt">-L</span> <span class="o">||</span> ssh-add

<span class="c"># confirm ssh access to github @ local</span>
ssh <span class="nt">-T</span> git@github.com

<span class="c"># confirm VM ssh access</span>
ssh <span class="nv">$ALIAS</span>
</code></pre></div></div>

<p>in VM, confirm ssh access to github too:</p>
<div class="language-sh highlighter-rouge"><div class="highlight"><pre class="highlight"><code>ssh <span class="nt">-T</span> git@github.com
<span class="c"># Hi kiprasmel! You've successfully authenticated, but GitHub</span>
<span class="c"># does not provide shell access.</span>
</code></pre></div></div>

<h4 id="install-dependencies">Install dependencies</h4>

<p>Follow relevant steps from the <a href="https://github.com/kiprasmel/infra/blob/master/local/devel-core-git/Dockerfile">Dockerfile</a>.</p>

<p><br /></p>

<h3 id="regarding-mount-performance">Regarding mount performance</h3>

<p>Now would be the time to clone git’s git repository locally &amp; mount it on the instance. Turns out - not the best idea. I had multiple annoyingly hidden issues that all came down to problems with mounting.</p>
<ul>
  <li>Builds failing with <code class="language-plaintext highlighter-rouge">Missing library</code> errors</li>
  <li>Builds failing with <code class="language-plaintext highlighter-rouge">Permission denied</code> errors</li>
  <li>Slow FS performance – build times &amp; commands like <code class="language-plaintext highlighter-rouge">git status</code> taking forever</li>
</ul>

<p>I spent way too much time trying to fix the permission errors, or installing the missing libraries, or increasing resources for the VM to make it faster.</p>

<p>Nope. It was mounts the whole time.</p>

<h4 id="the-solution">The solution</h4>

<p>Don’t use mounts at all. Can’t have mounting issues if you don’t have any mounts…</p>

<p>But no, really. We’ll use the instance’s filesystem directly, and we’ll push our changes to a remote repository to keep a backup. Simple as.</p>

<p><br /></p>

<h2 id="appendix-x--make--j-withwithout-nproc">Appendix X – “make -j” with/without nproc</h2>

<p>Writing the blog, and for myself, I want to make the commands fast &amp; easy to use.</p>

<p>I was used to <code class="language-plaintext highlighter-rouge">make -j $(nproc)</code>, but wondered if the <code class="language-plaintext highlighter-rouge">nproc</code> is necessary – shouldn’t <code class="language-plaintext highlighter-rouge">make</code>’s <code class="language-plaintext highlighter-rouge">-j</code> flag automatically infer the number of available processors, if the amount wasn’t specified by the user?</p>

<p>Turns out – not at all, and the <code class="language-plaintext highlighter-rouge">$(nproc)</code> part is very much necessary. Without it, when given <code class="language-plaintext highlighter-rouge">-j</code>, <code class="language-plaintext highlighter-rouge">make</code> will spawn an unlimited amount of jobs…</p>

<blockquote>
  <div class="language-plaintext highlighter-rouge"><div class="highlight"><pre class="highlight"><code>   -j [jobs], --jobs[=jobs]
        &lt;...&gt;
        If the -j option is given without an argument, make will not limit the
        number of jobs that can run simultaneously.
</code></pre></div>  </div>
</blockquote>

<p>This is bad, because in a VM with limited resources, you’re likely to get the compilation process killed by the kernel because of OOM issues.</p>

<!--
TODO: pic htop 1K tasks?
-->

<p>Also, it makes the compilation take much longer than if the job limit was specified.</p>

<p>I ran some testing to see what the optimal job limit was, and indeed the optimal amount was the number of processors available, i.e. what <code class="language-plaintext highlighter-rouge">nproc</code> gives. So use <code class="language-plaintext highlighter-rouge">make -j $(nproc)</code>.</p>

<p><br /></p>

<hr />

<p><br />
<br /></p>

<p>Got suggestions? <a href="mailto:kipras@kipras.org?subject=About developing core git on macos">Email me</a>.</p>

<!--
Otherwise, discuss on twitter:
TODO
-->

<p><br /></p>]]></content><author><name>Kipras Melnikovas</name></author><summary type="html"><![CDATA[By the end of this article, you’ll have a fast &amp; comfortable setup to develop, debug and contribute to core git on MacOS (apple silicon). You’ll explore git’s codebase with various tools, write your very first patch, and learn a thing or two about the contribution process.]]></summary><media:thumbnail xmlns:media="http://search.yahoo.com/mrss/" url="https://blog.kipras.org/assets/devel-core-git-macos/preview.png" /><media:content medium="image" url="https://blog.kipras.org/assets/devel-core-git-macos/preview.png" xmlns:media="http://search.yahoo.com/mrss/" /></entry></feed>