Develop, debug and contribute to core git on MacOS
By the end of this article, you’ll have a fast & comfortable setup to develop, debug and contribute to core git on MacOS (apple silicon). You’ll explore git’s codebase with various tools, write your very first patch, and learn a thing or two about the contribution process.
Contents
- Setup a lightweight linux environment (
gdb& friends don’t work on apple silicon) - The development workflow with
VSCode,VSCodium,Neovimor other - The debug workflow with
gdb, and thengdb-server+ editor of choice - Exploring code via call graphs using
valgrind,kcachegrindandhotspot - Writing your very first patch
- Advice for submitting patches & other resources
- Appendix
Lightweight linux environment
Apart from being easier to setup for development, and more closely matching the environment that most people use to contribute to core git, linux also has a much more convenient debugging tool - gdb. We’ll be utilizing gdb-server to make debugging with VSCode a breeze. For all this, we’ll need a linux environment.
I’ve tried a few different approaches:
- A simple docker container
- Dev Containers / Docker Dev Environments
- Multipass
My original choice was Multipass – it looked like the right tool for the job. However, I kept running into various issues, which are discussed below in Appendix X.
Then I tried Dev Containers, but they didn’t provide anything better over a simple docker container; actually made it worse because there’s more dependencies to install to get started.
So I finally tried just a simple docker container, and I couldn’t believe how easy it was to work with.
Let’s set it up:
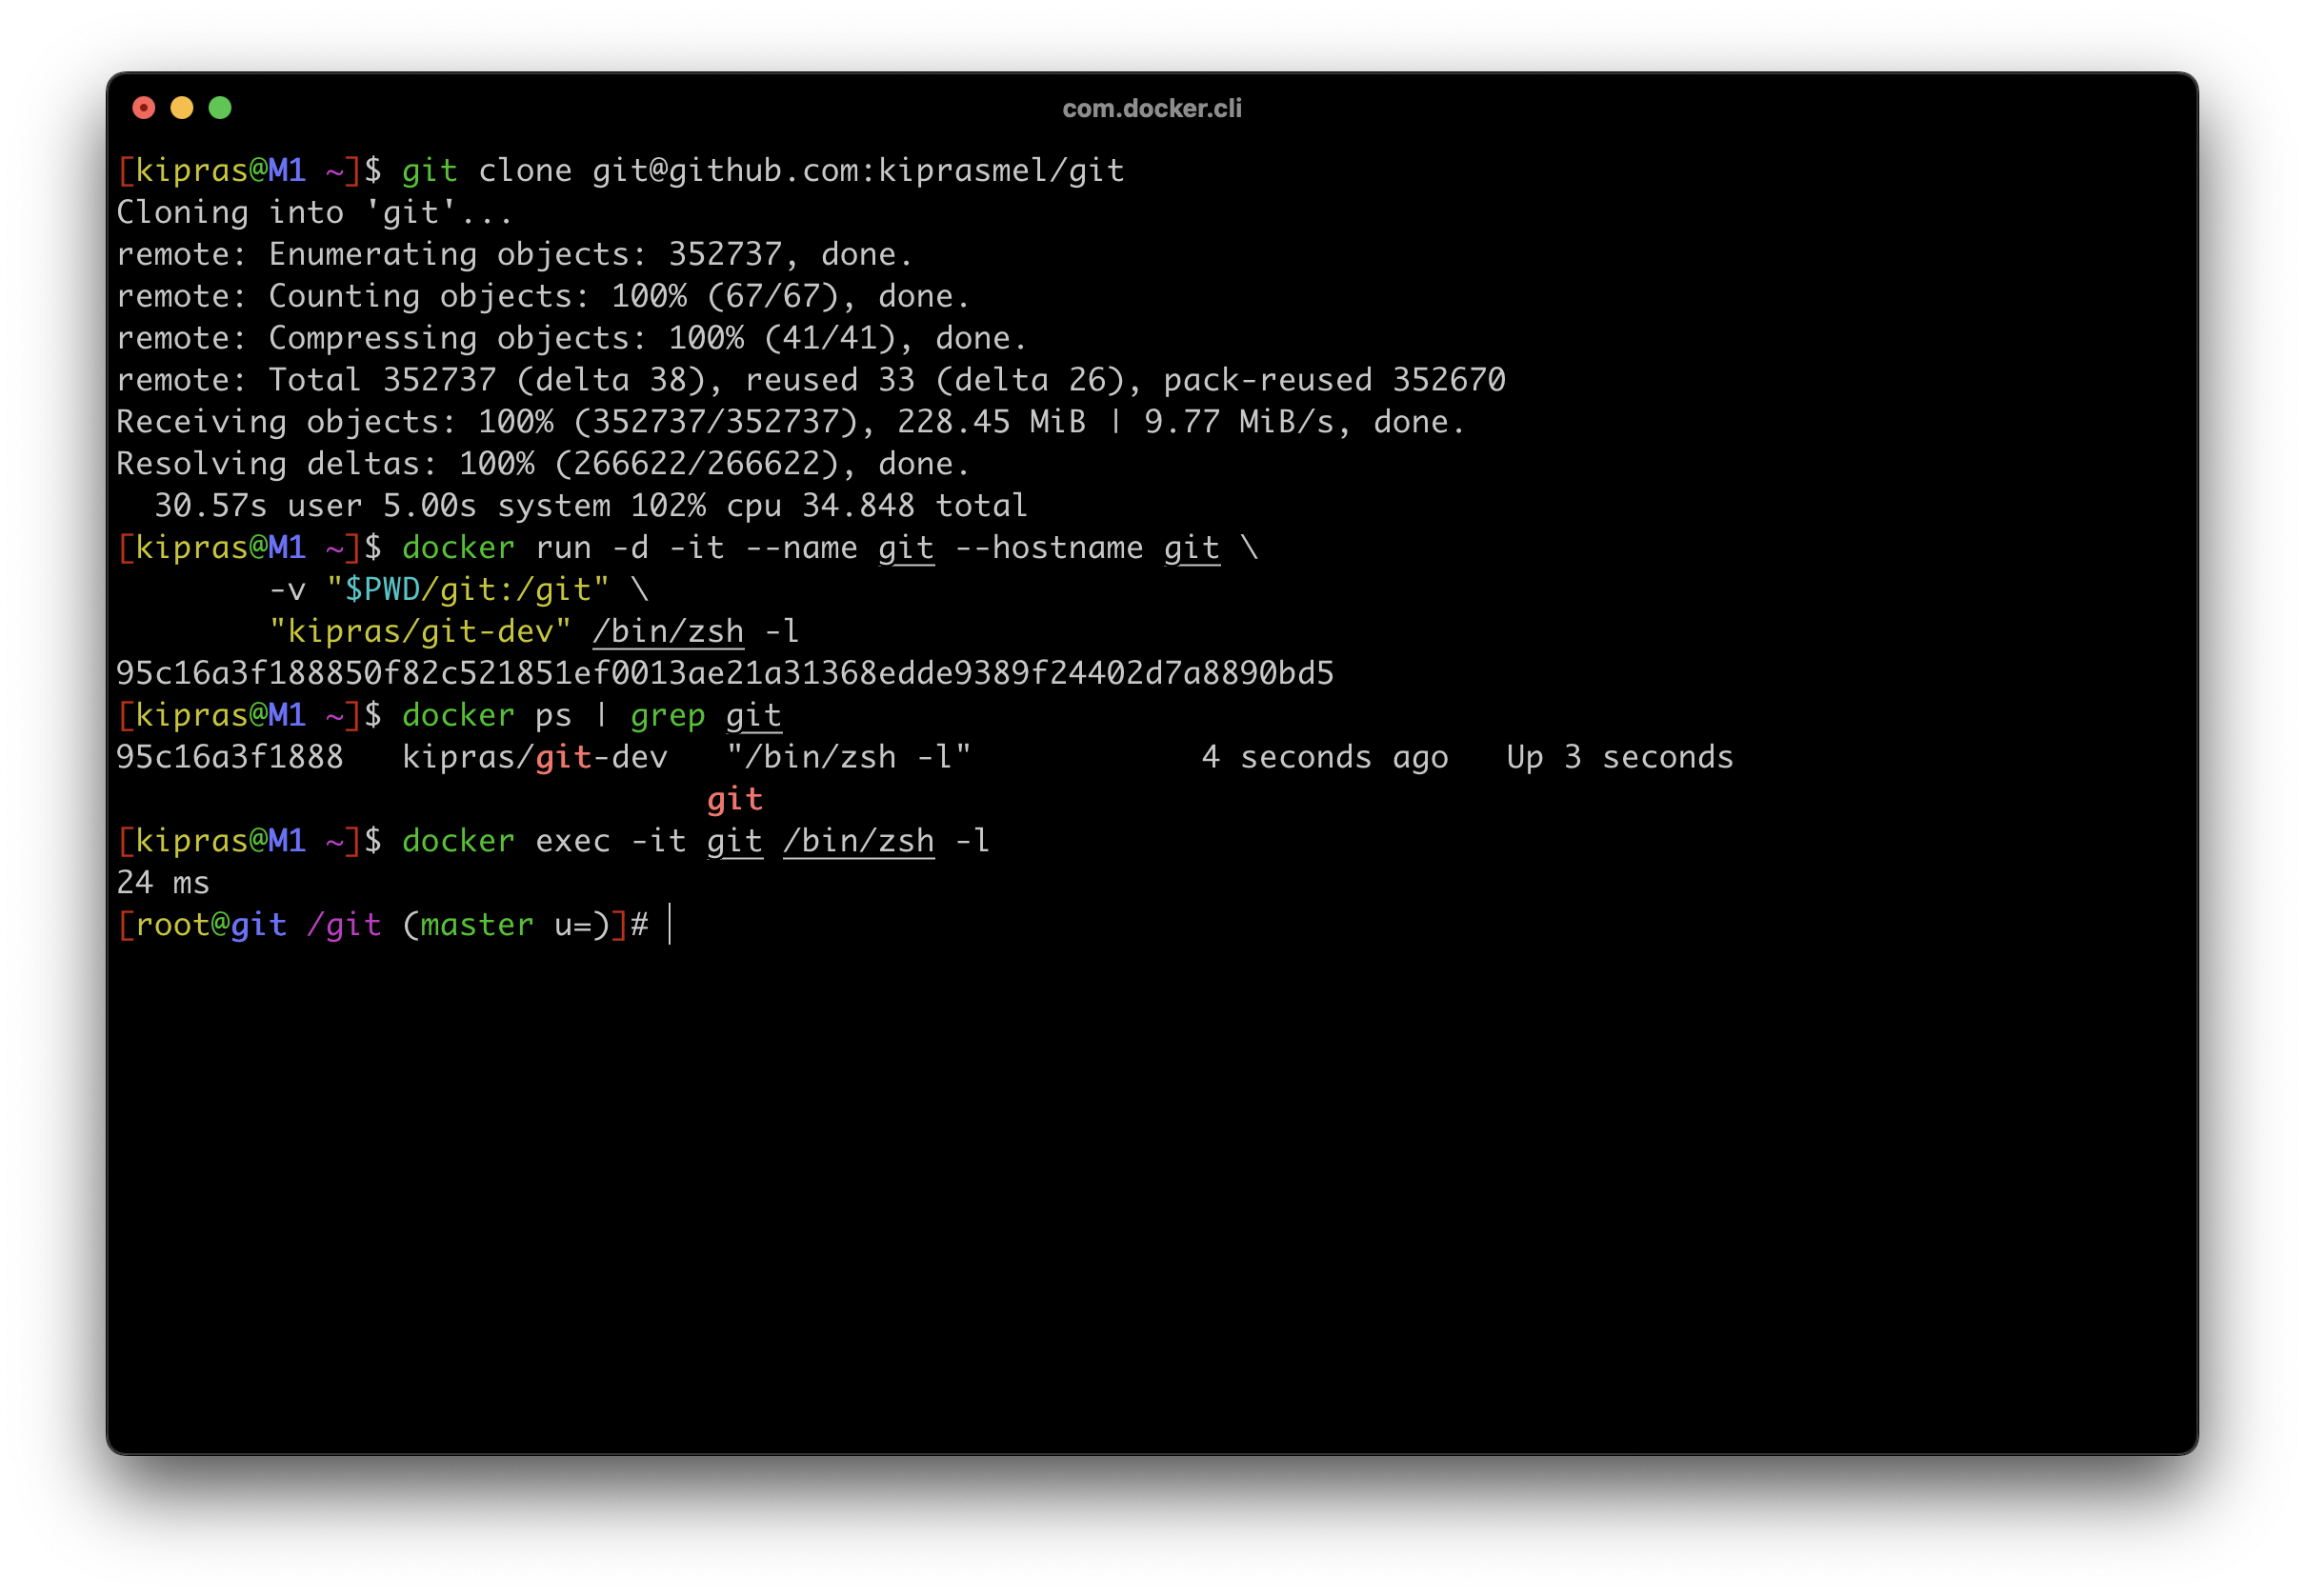
- 1st, let’s clone git’s git repo (it’s a good idea to fork it on GitHub: https://github.com/git/git/fork)
git clone https://github.com/git/git
git clone git@github.com:git/git
- then, let’s run a docker container that I’ve prepared for developing core git. It includes a base ubuntu image, dependencies for developing & debugging git, and some extras for convenient use. The first
-vflag mounts the cloned git repo at/git, meanwhile-popens a local port2020for ssh access. The other flags are for X11, which we’ll come back to later.
docker run -d -it --name git --hostname git \
	-v "$PWD/git:/git" \
	-p 2020:22 \
	-e "DISPLAY=host.docker.internal:0" \
	-v "/tmp/.X11-unix:/tmp/.X11-unix" \
	-v "$HOME/.Xauthority:/root/.Xauthority" \
	"kipras/git-dev"
If you want to configure your own image, see the Dockerfile I used.
- and let’s open a shell into it
docker exec -it git zsh -l
and here it is:
- Let’s also configure ssh
cat >> ~/.ssh/config <<EOF
Host git
	HostName 	localhost
	Port 		2020
	User		root
	ForwardAgent 	yes
EOF

PUBKEY_PATH="$HOME/.ssh/id_rsa.pub"
PUBKEY="$(cat "$PUBKEY_PATH")"
docker exec git sh -c "echo '$PUBKEY' >> ~/.ssh/authorized_keys"
- and try it out
ssh git
Container setup is now complete.
Note: everything here can be automated, see my infra/local/devel-core-git scripts.
The development workflow
We’ll need an editor. Here I’ve described the setup for VSCode(ium), but I’ll look into setting up Neovim soon. If you have a nice setup for developing thru ssh / in a container, send me an email.
Installing VSCode(ium)
If you’re fine with Microsoft’s edition of VSCode (the default), which includes telemetry, tracking & proprietary licensing:
brew install --cask visual-studio-code

code --install-extension "webfreak.debug"
code --install-extension "ms-vscode-remote.remote-ssh"
code --install-extension "ms-vscode.cpptools-extension-pack"
Myself however, I prefer VSCodium – a “community-driven, freely-licensed binary distribution of VSCode”:
brew install --cask vscodium

codium --install-extension "webfreak.debug"
codium --install-extension "jeanp413.open-remote-ssh"
codium --install-extension "gediminaszlatkus.ctags-companion"

echo 'alias code="codium"' >> ~/.zshrc
source ~/.zshrc
Usage
code
There’s a little button in the very bottom left - “Open a Remote Window”. Through it, another dialog opens, allowing to select which remote to connect to. Recall our git ssh host - use that.
VSCode will now setup a vscode-server in the remote. Upon finishing, a new window, connected to the git host, will appear.
In the remotely-connected VSCode, open the /git project, and then open the integrated terminal via
Ctrl + `
Setting up intellisense (go to definition, find references, etc)
-
First, make sure extensions installed locally are available in the remote (docker container). VSCode doesn’t do this automatically, so via
Cmd+Shift+Prun “Remote: Install local extensions in ‘SSH: git’”. - Then, if you installed Microsoft’s VSCode, you’re all set.
- For VSCodium, we’ll need to generate extra information via universal-ctags (already preinstalled in the container):
ctags -R --fields=+nKz
Building git from source
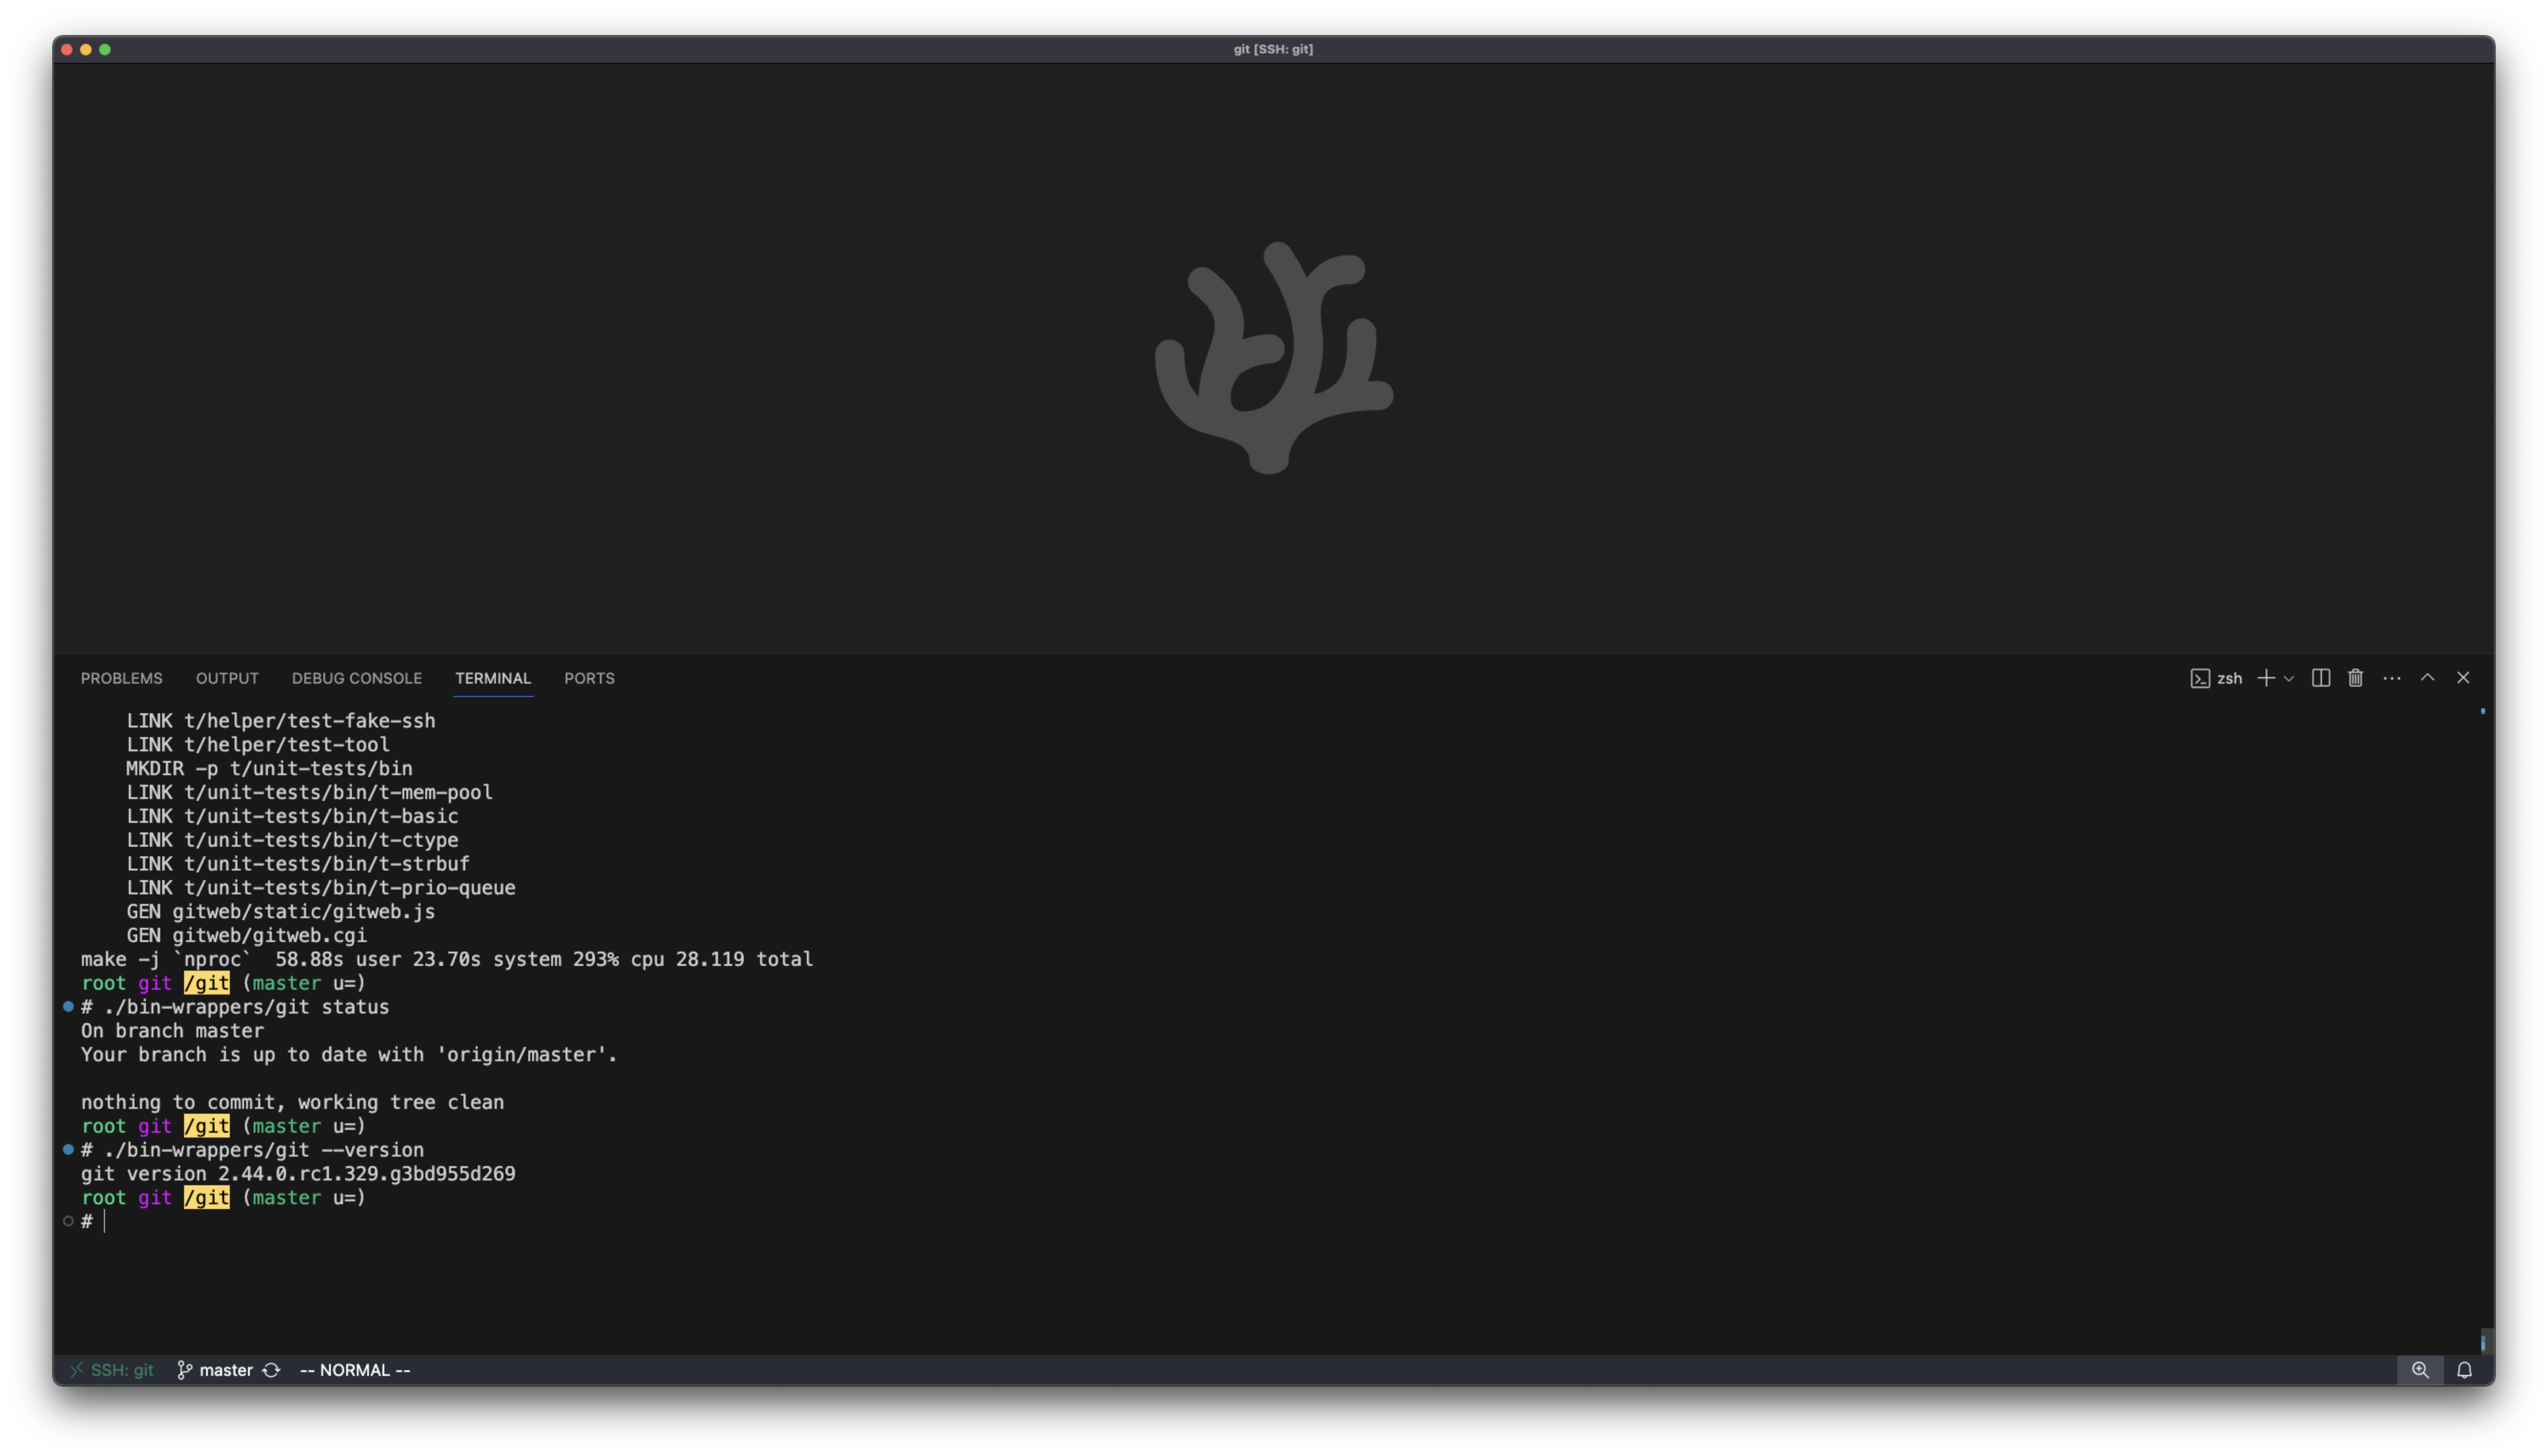
- Configure & build:
cat > config.mak <<EOF
DEVELOPER=1
CFLAGS += -O0
CFLAGS += -g3
CFLAGS += -Wall
CFLAGS += -fno-omit-frame-pointer -fno-inline-functions
CFLAGS += -fno-inline-functions-called-once -fno-optimize-sibling-calls
EOF

time make -j `nproc`
- run & confirm works:
./bin-wrappers/git status
./bin-wrappers/git --version
Looking good so far:
My vscode config, managed via code-settings-sync.
Debugging
The ./bin-wrappers/git script is a convenient wrapper that we’ll use to run the compiled git binary.
gdb
Let’s first try debugging with just gdb. We can run whatever git command we want to explore; let’s try git status:
GIT_DEBUGGER=1 ./bin-wrappers/git status
tui enable
set print thread-events off
b cmd_status
b wt_status_print
r
c
n
n
n
n
n
n
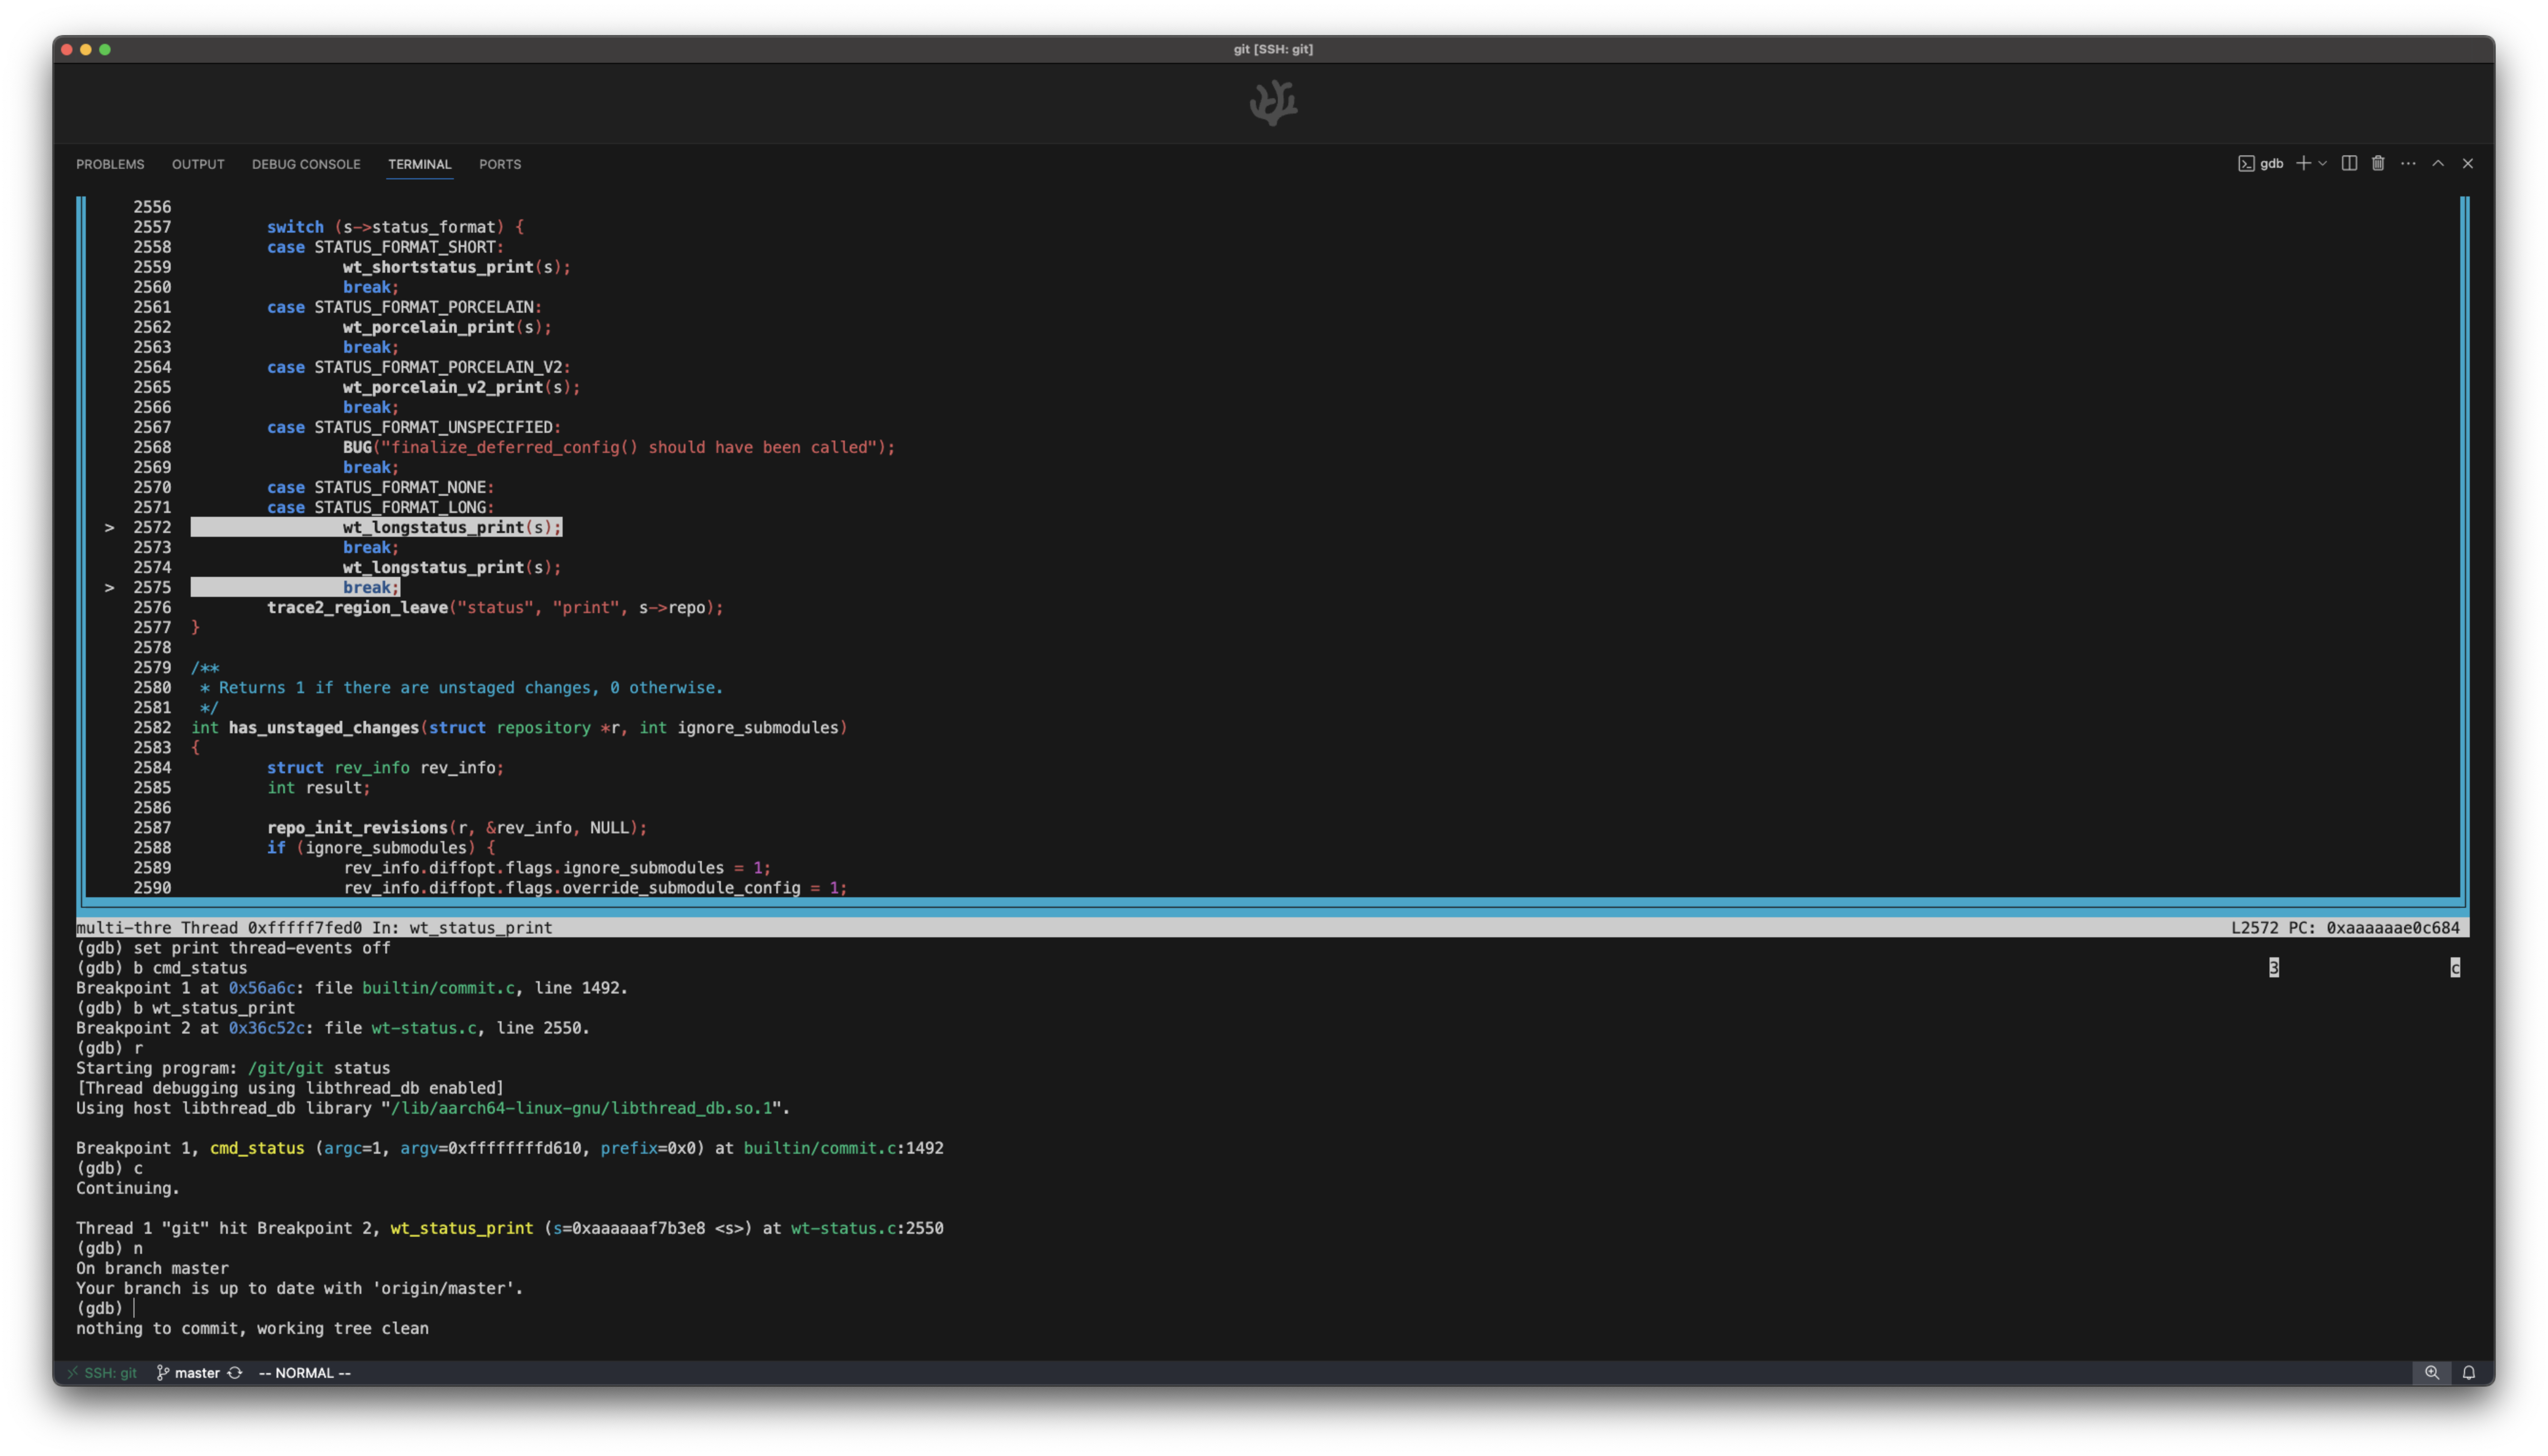
You can do a lot with just plain gdb – see a writeup by Philippe Blain which goes into more depth about this.
You could even set up gef or gdb-dashboard..
gdb-server + VSCode
Myself I prefer something more visual / interactive. So let’s setup the debugging workflow for VSCode.
We’ve already installed the Native Debug extension. gdb-server is also preinstalled in the container.
- We’ll just need a
.vscode/launch.jsonfile:
mkdir -p .vscode
cat > .vscode/launch.json <<'EOF'
{
	"version": "0.2.0",
	"configurations": [
		{
			"type": "gdb",
			"request": "attach",
			"name": "Attach to gdb-server",
			"executable": "${workspaceFolder}/git",
			"target": "localhost:5177",
			"remote": true,
			"cwd": "${workspaceRoot}",
			"gdbpath": "/usr/bin/gdb"
		}
	]
}
EOF
- then we’ll simply launch
gdb-server:
GIT_DEBUGGER="gdbserver localhost:5177" /git/bin-wrappers/git status
-
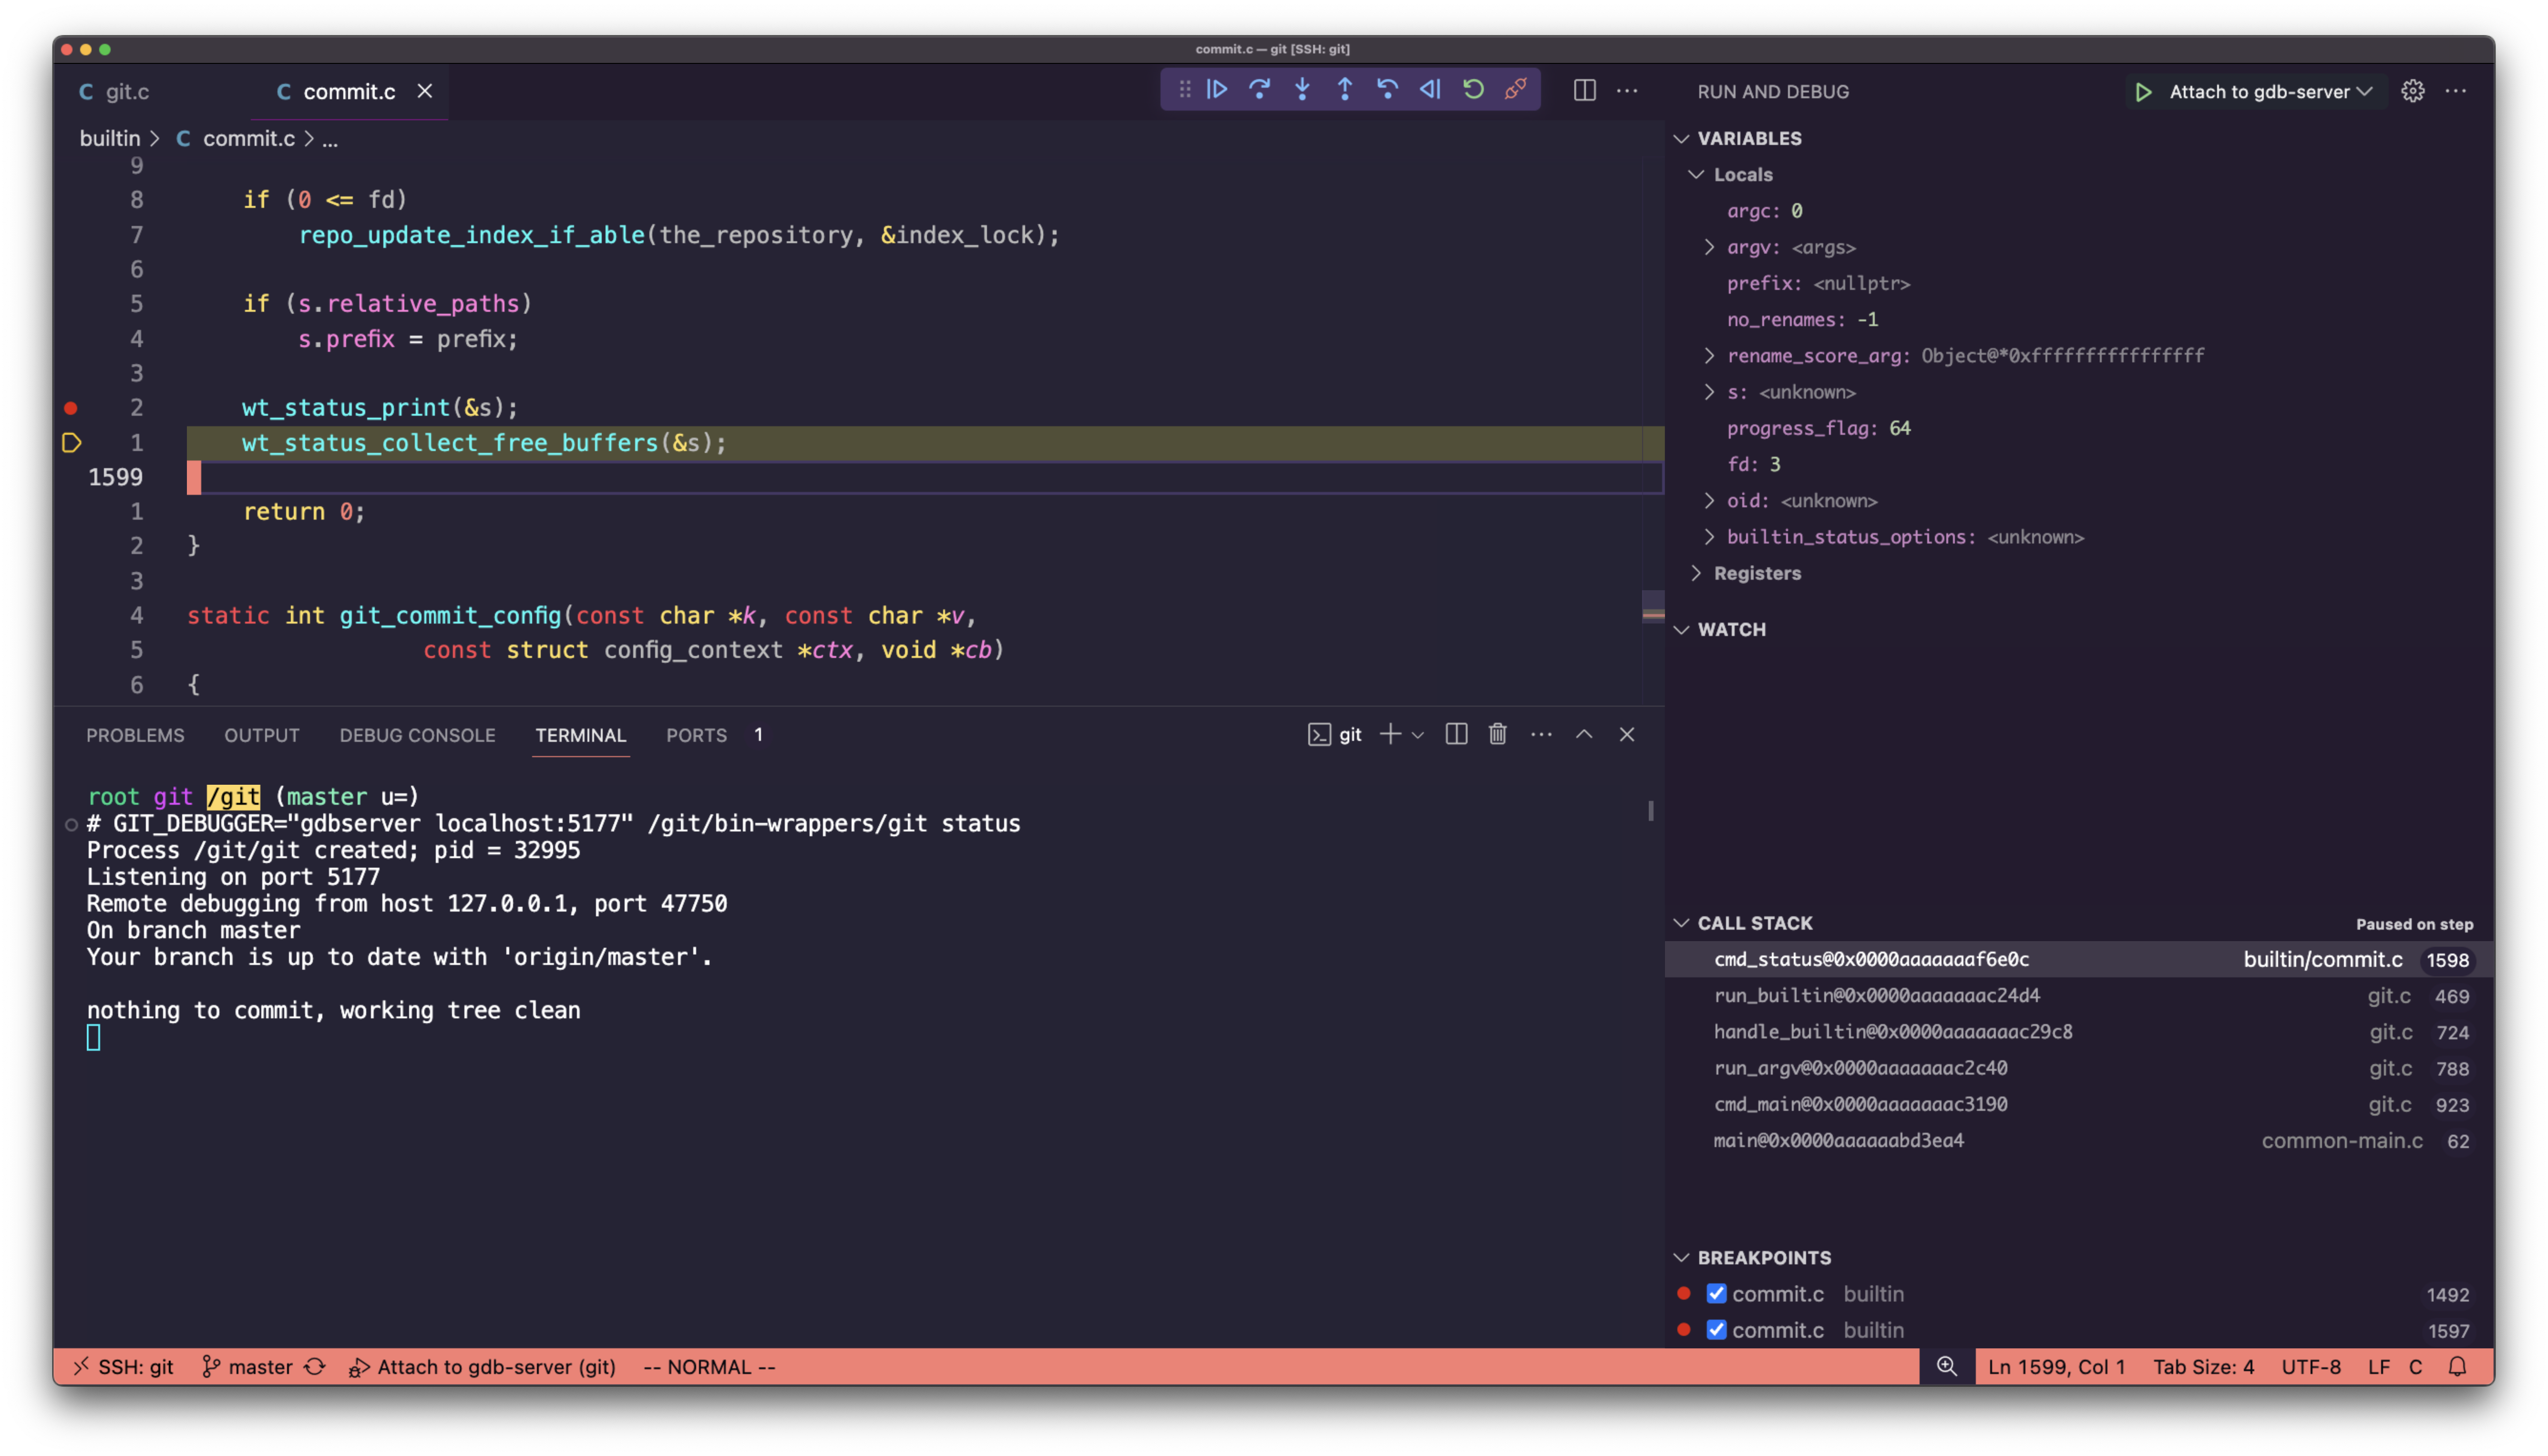
then, let’s set a breakpoint – open the file selector via
Cmd+P, open filebuiltin/commit.c, find (Cmd+F) thecmd_statusfunction, and add a breakpoint. -
finally, connect to the gdb-server thru VSCode – open the debug panel via
Cmd+Shift+D, select theAttach to gdb-servertask, and start debugging!
Writing your very first patch
Alright, let’s try changing something.
Let’s do something simple. How about this: when a user runs git status, we print an additional “Good morning/afternoon/evening” message. It’s pretty useless, but that’s not the point here - we’d simply like to get familiar with changing git’s code.
First, to make sure the example works, let’s find some common ground and create a new branch based off of v2.44.0:
git checkout -b my-cool-feature v2.44.0
But, where do we even start?
Call graphs to the resque
It has proven useful to have a high level overview of the codebase, prior to diving deeper into details, or repeatedly smashing the “Jump to definition” shortcut in your IDE of choice.
There are many tools to help us do just that - explore call/flame graphs. We’ll use valgrind + kcachegrind, and then hotspot.
We’ll need to run X11. Let’s setup xquartz:
brew install xquartz

# allow connections from network clients:
defaults write org.xquartz.X11.plist nolisten_tcp 0
and then reboot.
After each reboot, you’ll need to allow X11 access and start the docker container:
xhost +
docker start git
Back in the container:
apt install -y valgrind kcachegrind dbus-x11 x11-apps

# verify x11 + xquartz setup works:
xeyes
some eyes should show up 👀
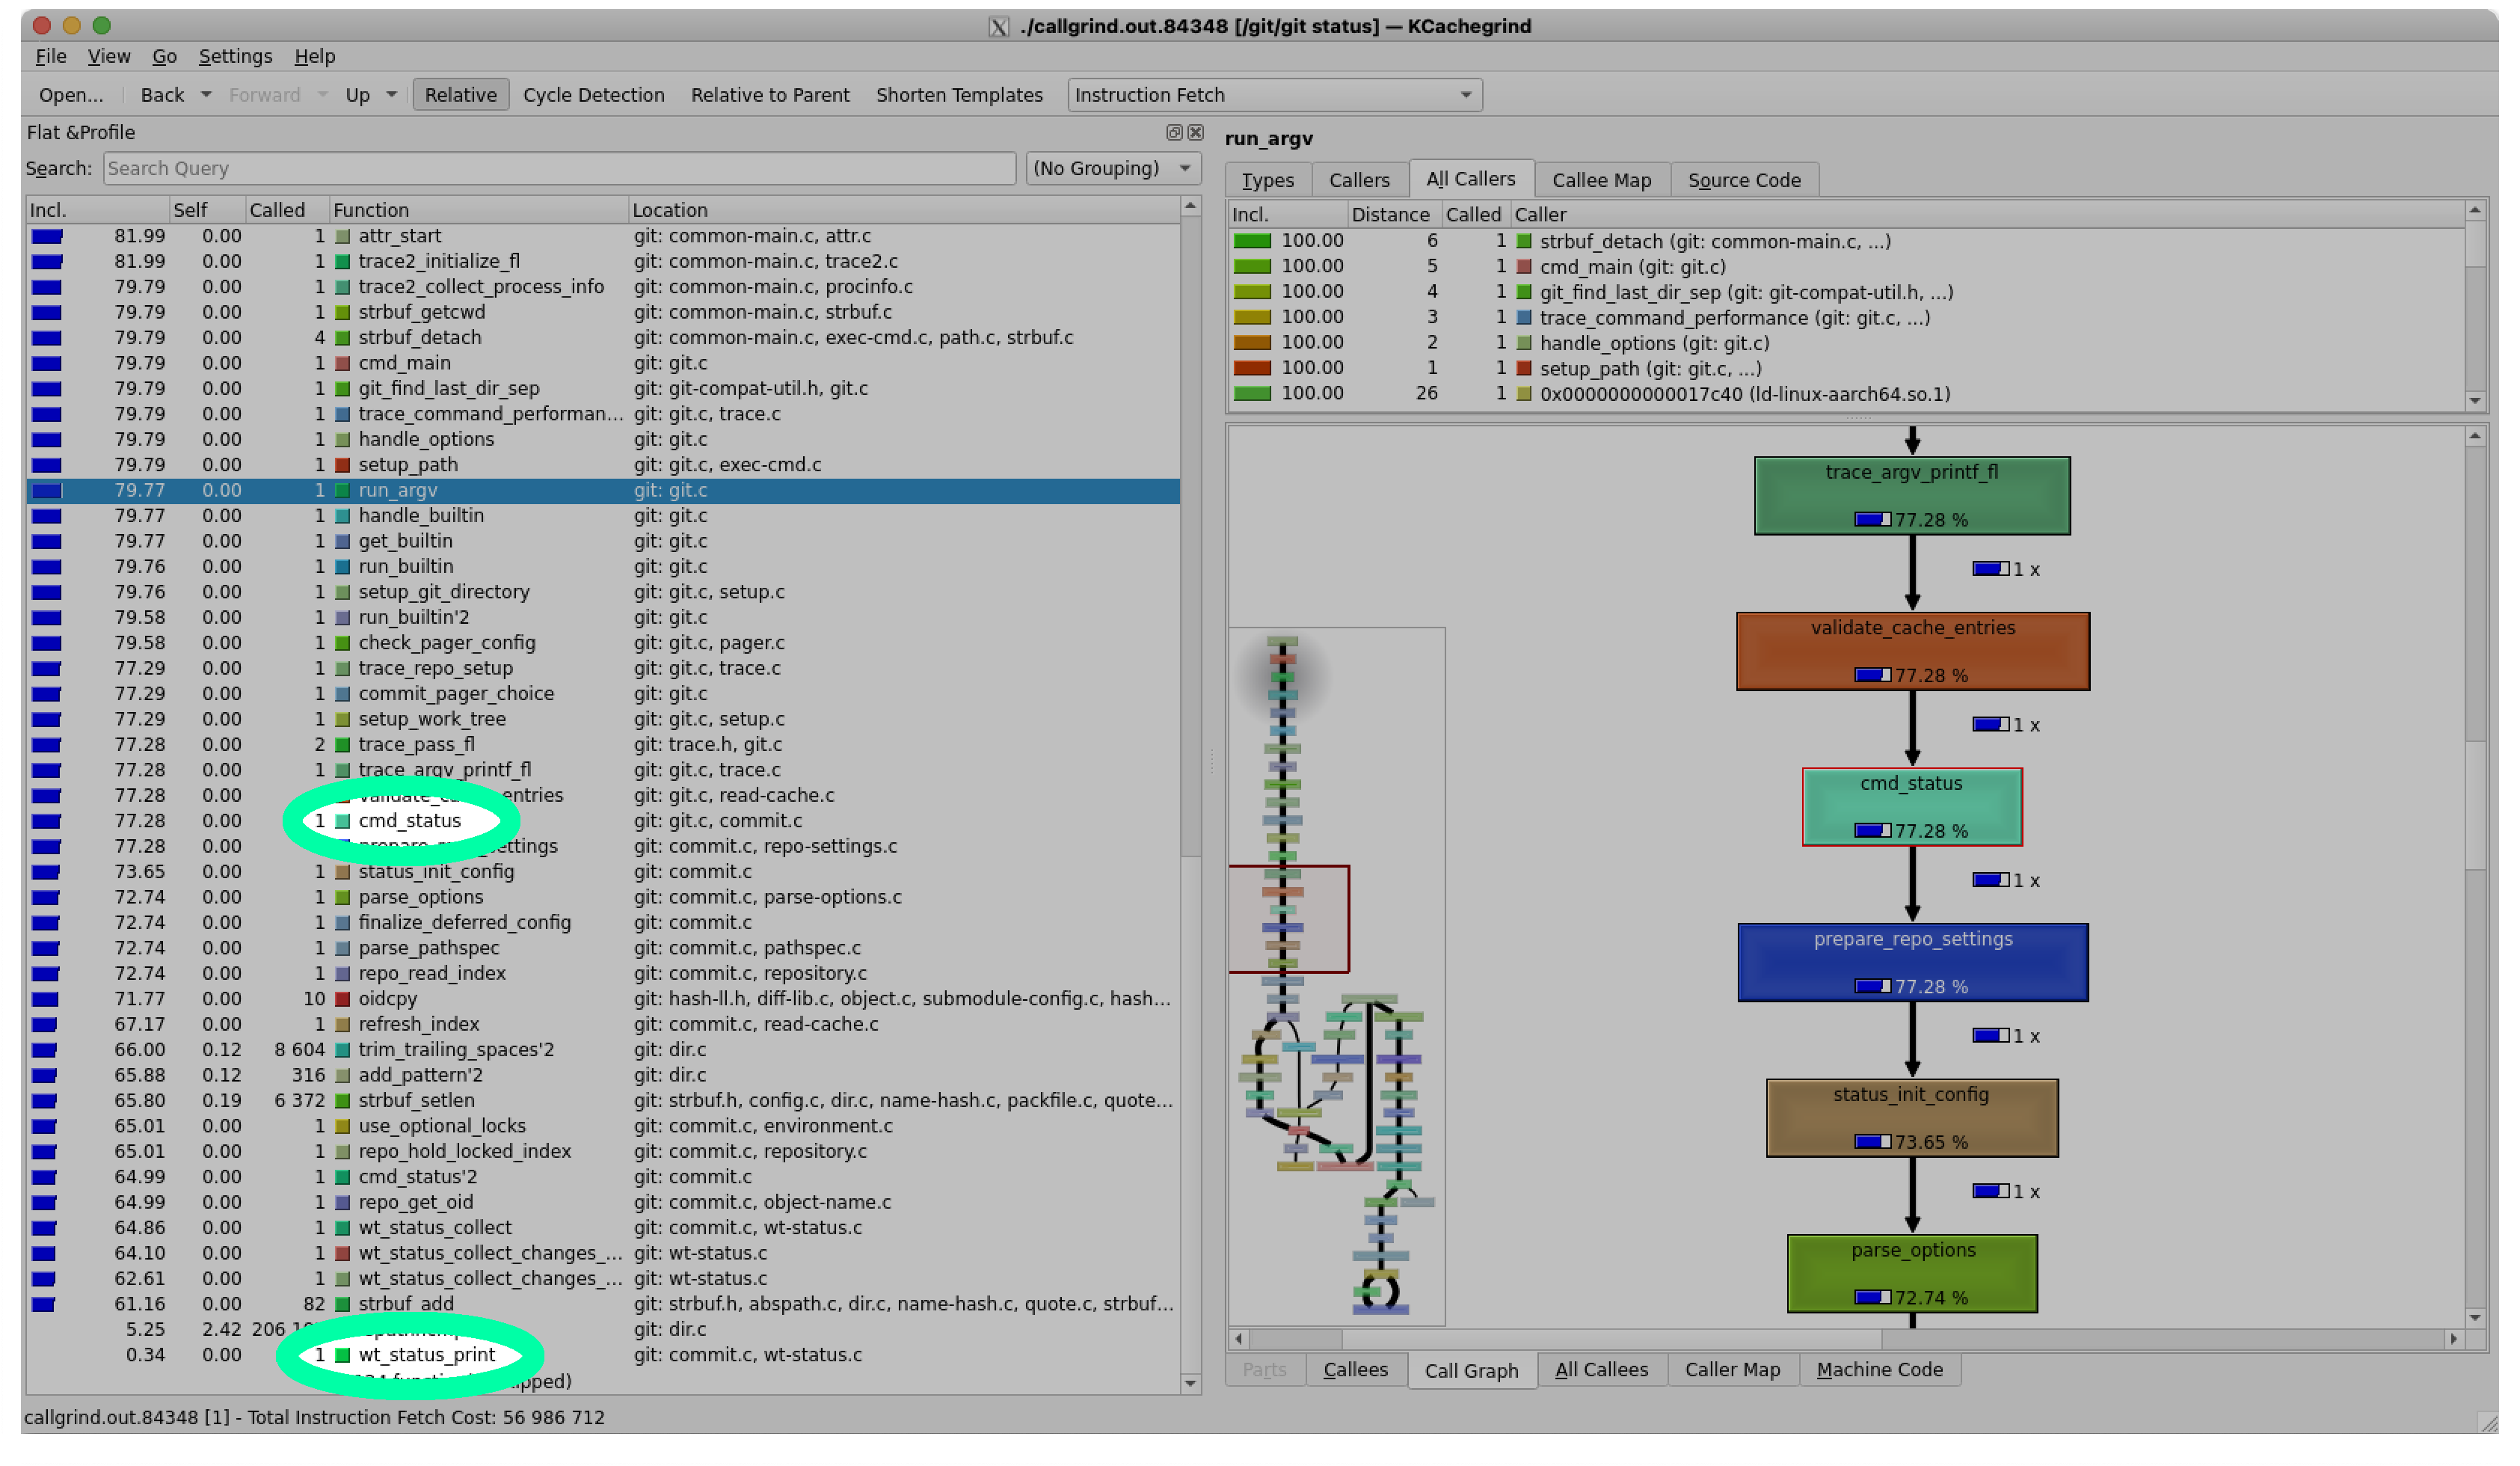
Valgrind + kcachegrind
Generate the callgraph for git status:
GIT_DEBUGGER="valgrind --tool=callgrind --instr-atstart=yes" \
	./bin-wrappers/git status
and then inspect it:
kcachegrind ./callgrind.out.*
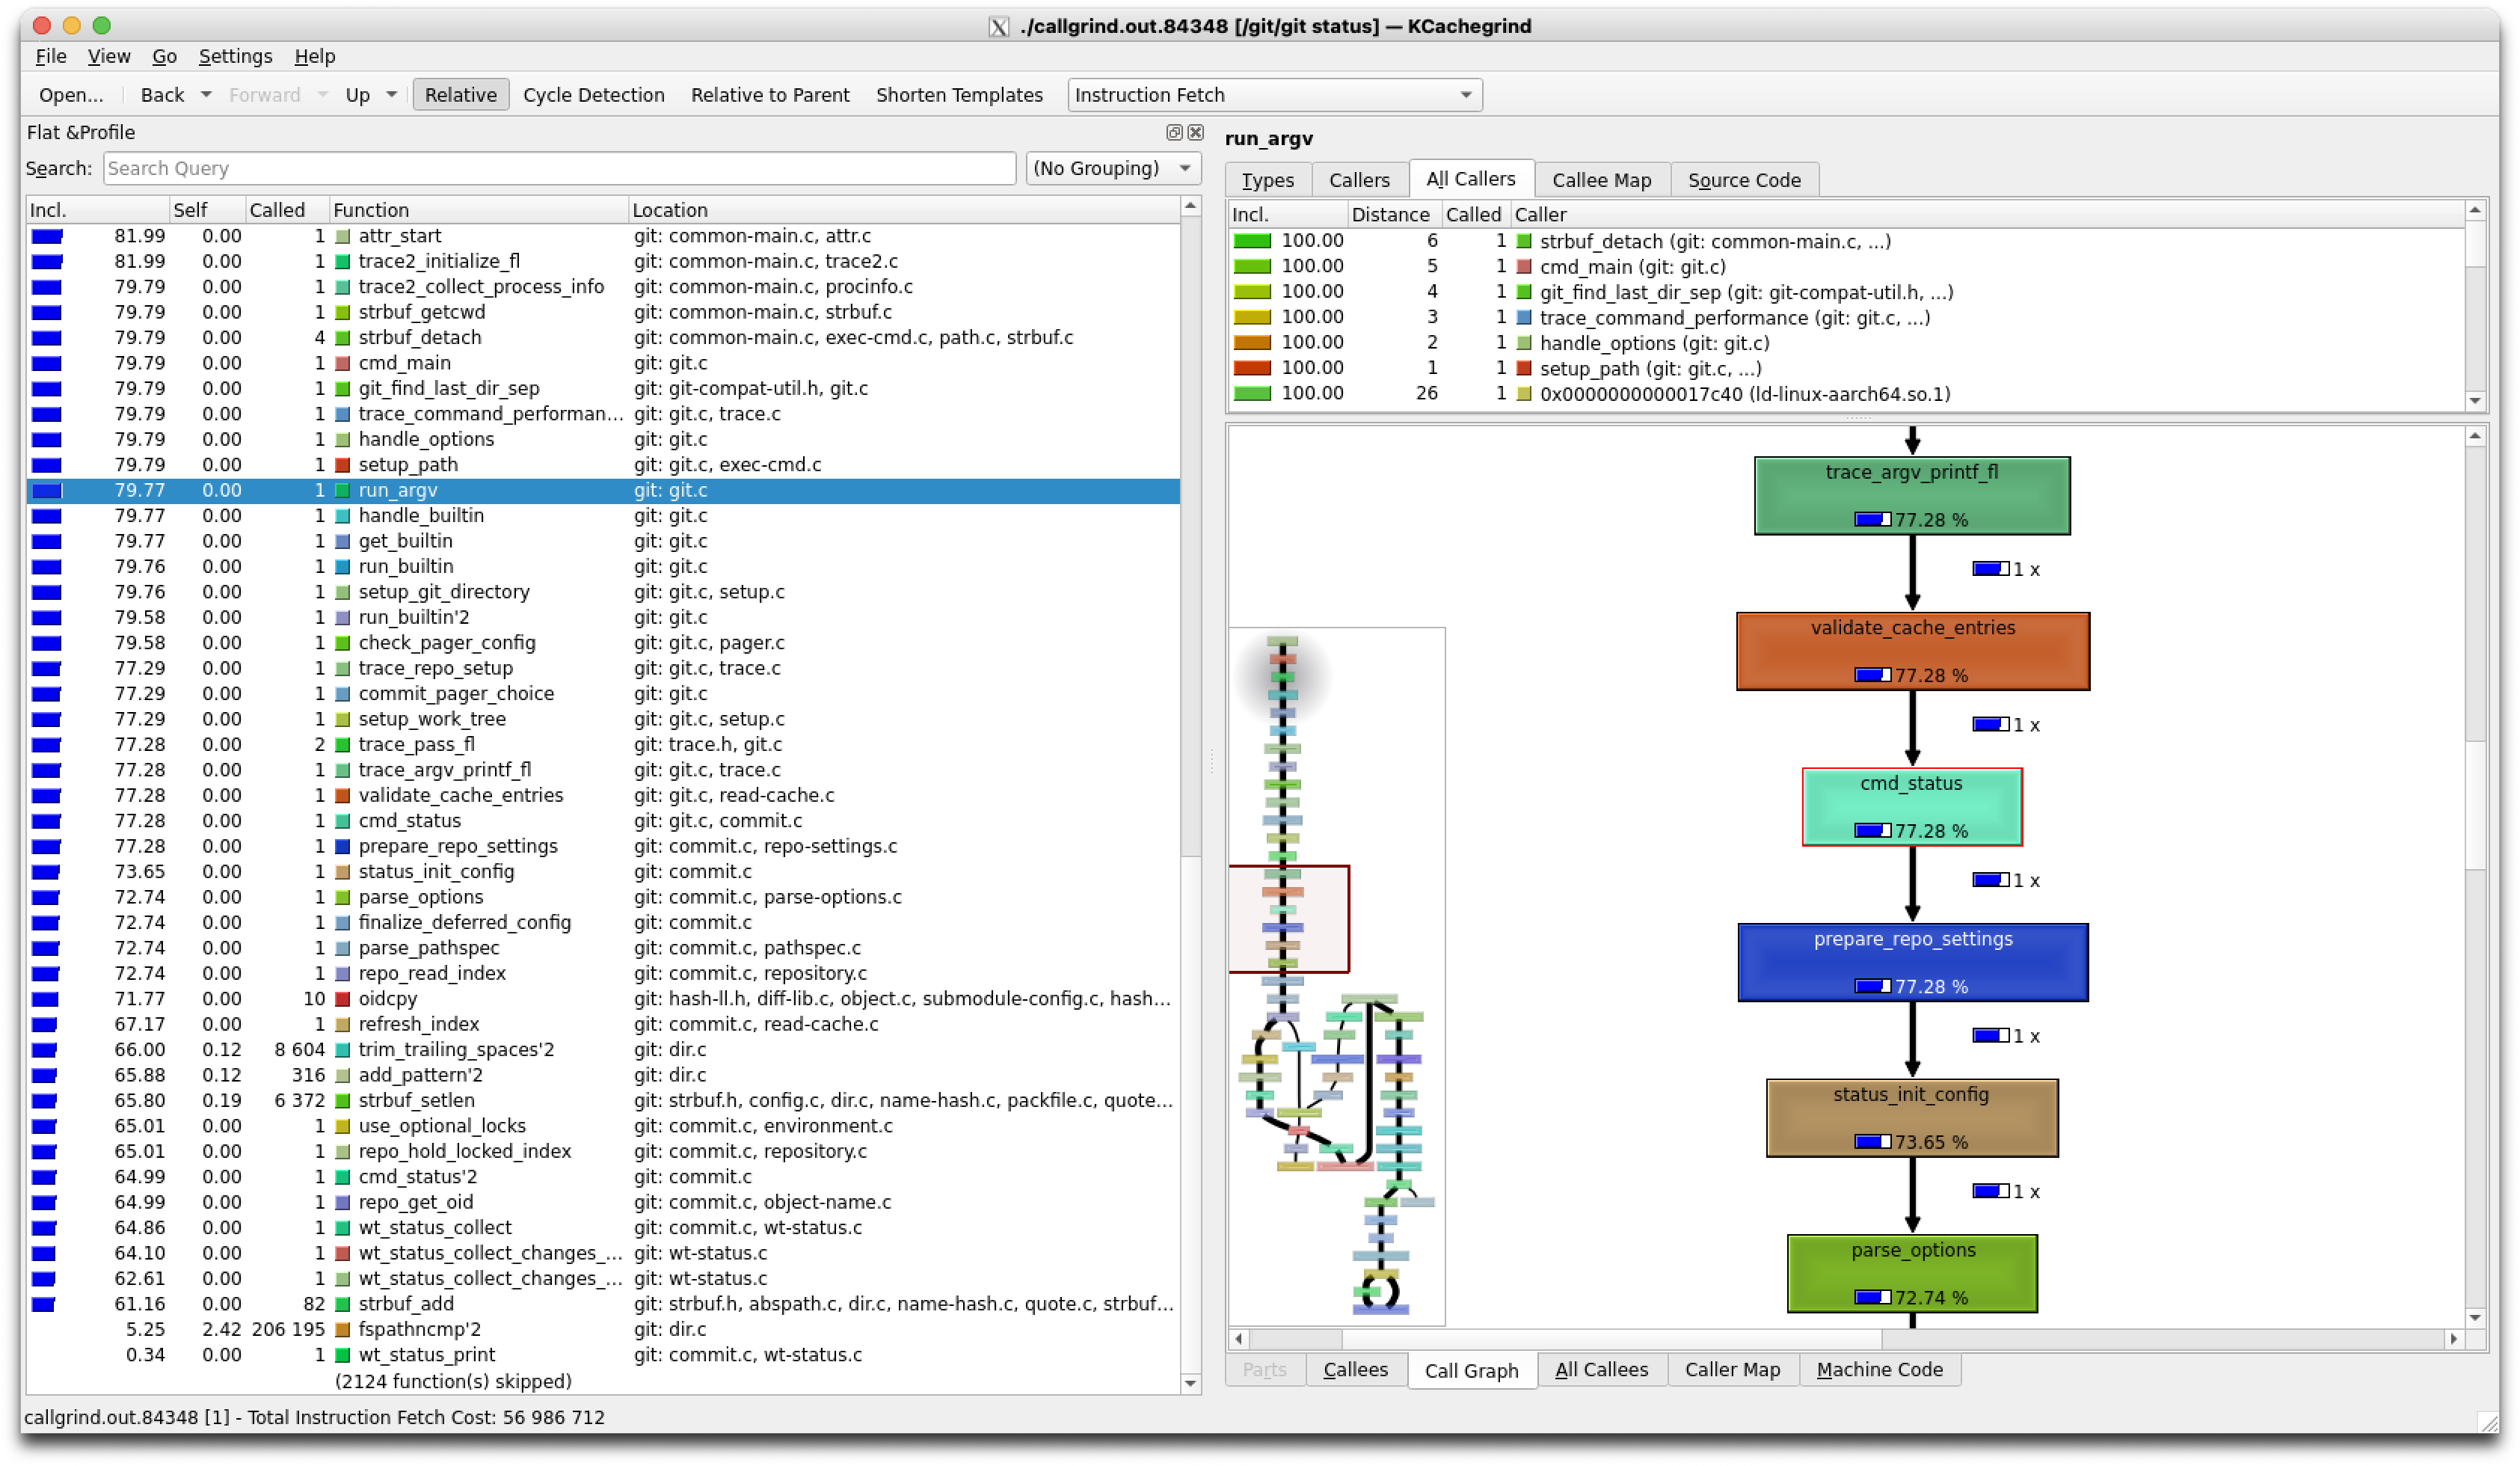
kcachegrind, with “Cycle Detection” off, and inside the “Call Graph” view. Quick overview.
The UI is surprisingly easy to use. The idea is simple – get a high-level overview of how a certain command works, and then dig deeper into the code with a regular debugger like gdb as discussed above.
If you recall our debugging experiments, we set a few breakpoints, e.g. at cmd_status and wt_status_print – using a call graph it becomes trivial to find important parts of the code like this.
hotspot
Soon™️
Advice for submitting patches
Soon™️
Appendix X – Multipass
Soon™️
As briefly touched on before, multipass was my original go-to, until I started having issues and realized how much easier it is to work with a simple docker container.
The issues I encountered:
- mount performance
- Multipass uses
sshfsfor compatibility. Of course it’s slow. An alternative is available - “native mounts”. However, for me they didn’t improve the situation at all. - I even tried mounting manually with osxfuse, but no cigar.
- Multipass uses
Nonetheless, sometimes you can only learn from your own mistakes, so here’s the original “how to get started” with multipass (note it might be outdated since not maintained).
Setup
brew install --cask multipass
Creating an instance is simple. The resources can be changed later (except disk which can only be expanded). You definitely don’t need as many cpus; it’s just faster to compile, and there’ll be no effect to your system when they’re not in use anyway.
multipass launch --cpus 8 --memory 8G --disk 16G
this will create a “primary” instance, which means that many multipass commands won’t require you to provide a name of the instance, and will default to the primary one, for convenience.
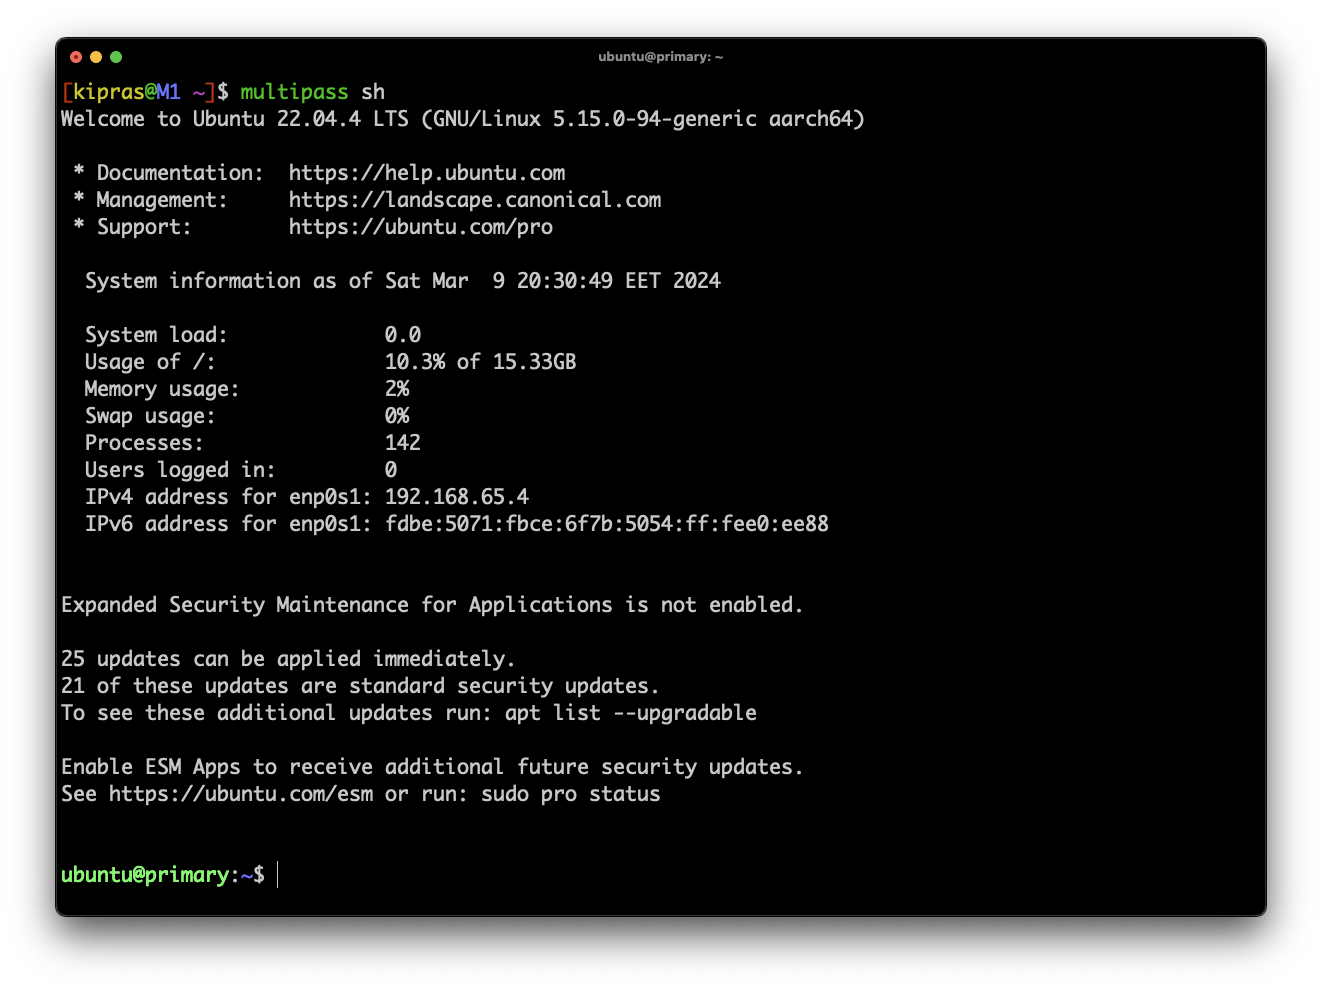
Let’s connect to our newly created instance via ssh:
multipass sh
and here it is:
Back on the host, let’s also setup an ssh alias vm, so that we can use it when connecting to the instance thru VSCode.
VM="primary"
ALIAS="vm"
PUBKEY="$(cat ~/.ssh/id_rsa.pub)"
IP="$(multipass info --format=csv "$VM" | tail -n1 | cut -d, -f3)"

# alias
cat >> ~/.ssh/config <<EOF
Host $ALIAS
	HostName $IP
	User     ubuntu

	# share local ssh key with VM
	# see https://docs.github.com/en/authentication/connecting-to-github-with-ssh/using-ssh-agent-forwarding
	ForwardAgent yes
EOF

# authorize
multipass exec -n "$VM" -- \
	bash -c "echo '$PUBKEY' >> ~/.ssh/authorized_keys"

# add ssh identity to ssh-agent
ssh-add -L || ssh-add

# confirm ssh access to github @ local
ssh -T git@github.com

# confirm VM ssh access
ssh $ALIAS
in VM, confirm ssh access to github too:
ssh -T git@github.com
# Hi kiprasmel! You've successfully authenticated, but GitHub
# does not provide shell access.
Install dependencies
Follow relevant steps from the Dockerfile.
Regarding mount performance
Now would be the time to clone git’s git repository locally & mount it on the instance. Turns out - not the best idea. I had multiple annoyingly hidden issues that all came down to problems with mounting.
- Builds failing with
Missing libraryerrors - Builds failing with
Permission deniederrors - Slow FS performance – build times & commands like
git statustaking forever
I spent way too much time trying to fix the permission errors, or installing the missing libraries, or increasing resources for the VM to make it faster.
Nope. It was mounts the whole time.
The solution
Don’t use mounts at all. Can’t have mounting issues if you don’t have any mounts…
But no, really. We’ll use the instance’s filesystem directly, and we’ll push our changes to a remote repository to keep a backup. Simple as.
Appendix X – “make -j” with/without nproc
Writing the blog, and for myself, I want to make the commands fast & easy to use.
I was used to make -j $(nproc), but wondered if the nproc is necessary – shouldn’t make’s -j flag automatically infer the number of available processors, if the amount wasn’t specified by the user?
Turns out – not at all, and the $(nproc) part is very much necessary. Without it, when given -j, make will spawn an unlimited amount of jobs…
   -j [jobs], --jobs[=jobs]
        <...>
        If the -j option is given without an argument, make will not limit the
        number of jobs that can run simultaneously.
This is bad, because in a VM with limited resources, you’re likely to get the compilation process killed by the kernel because of OOM issues.
Also, it makes the compilation take much longer than if the job limit was specified.
I ran some testing to see what the optimal job limit was, and indeed the optimal amount was the number of processors available, i.e. what nproc gives. So use make -j $(nproc).
Got suggestions? Email me.